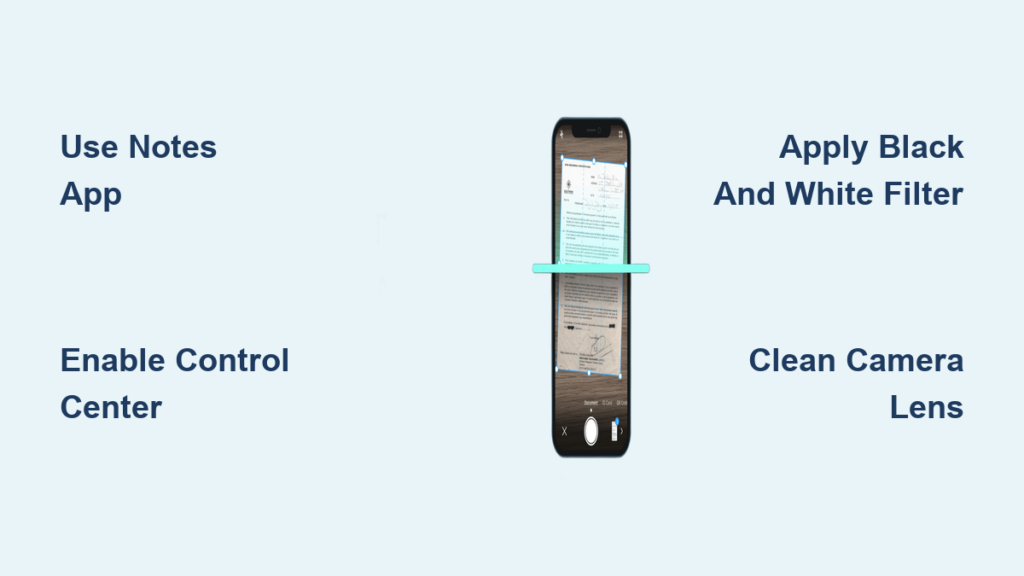
Need to scan a document fast? Your iPhone has a built-in scanner that works instantly without any extra apps. Whether it is a receipt, contract, or school handout, you can turn any paper into a digital PDF in seconds using just your iPhone camera and iOS tools. The best part? It is free, easy, and available right now in the Notes, Files, or Control Center.
The scanner uses automatic edge detection, perspective correction, and OCR to create clean, readable, and searchable documents. You can scan multiple pages, adjust filters, annotate, and share directly from your device. In this guide, you will learn how to use every scanning method on iPhone, get pro tips for perfect scans, and avoid common mistakes.
Scan Documents Using the Notes App
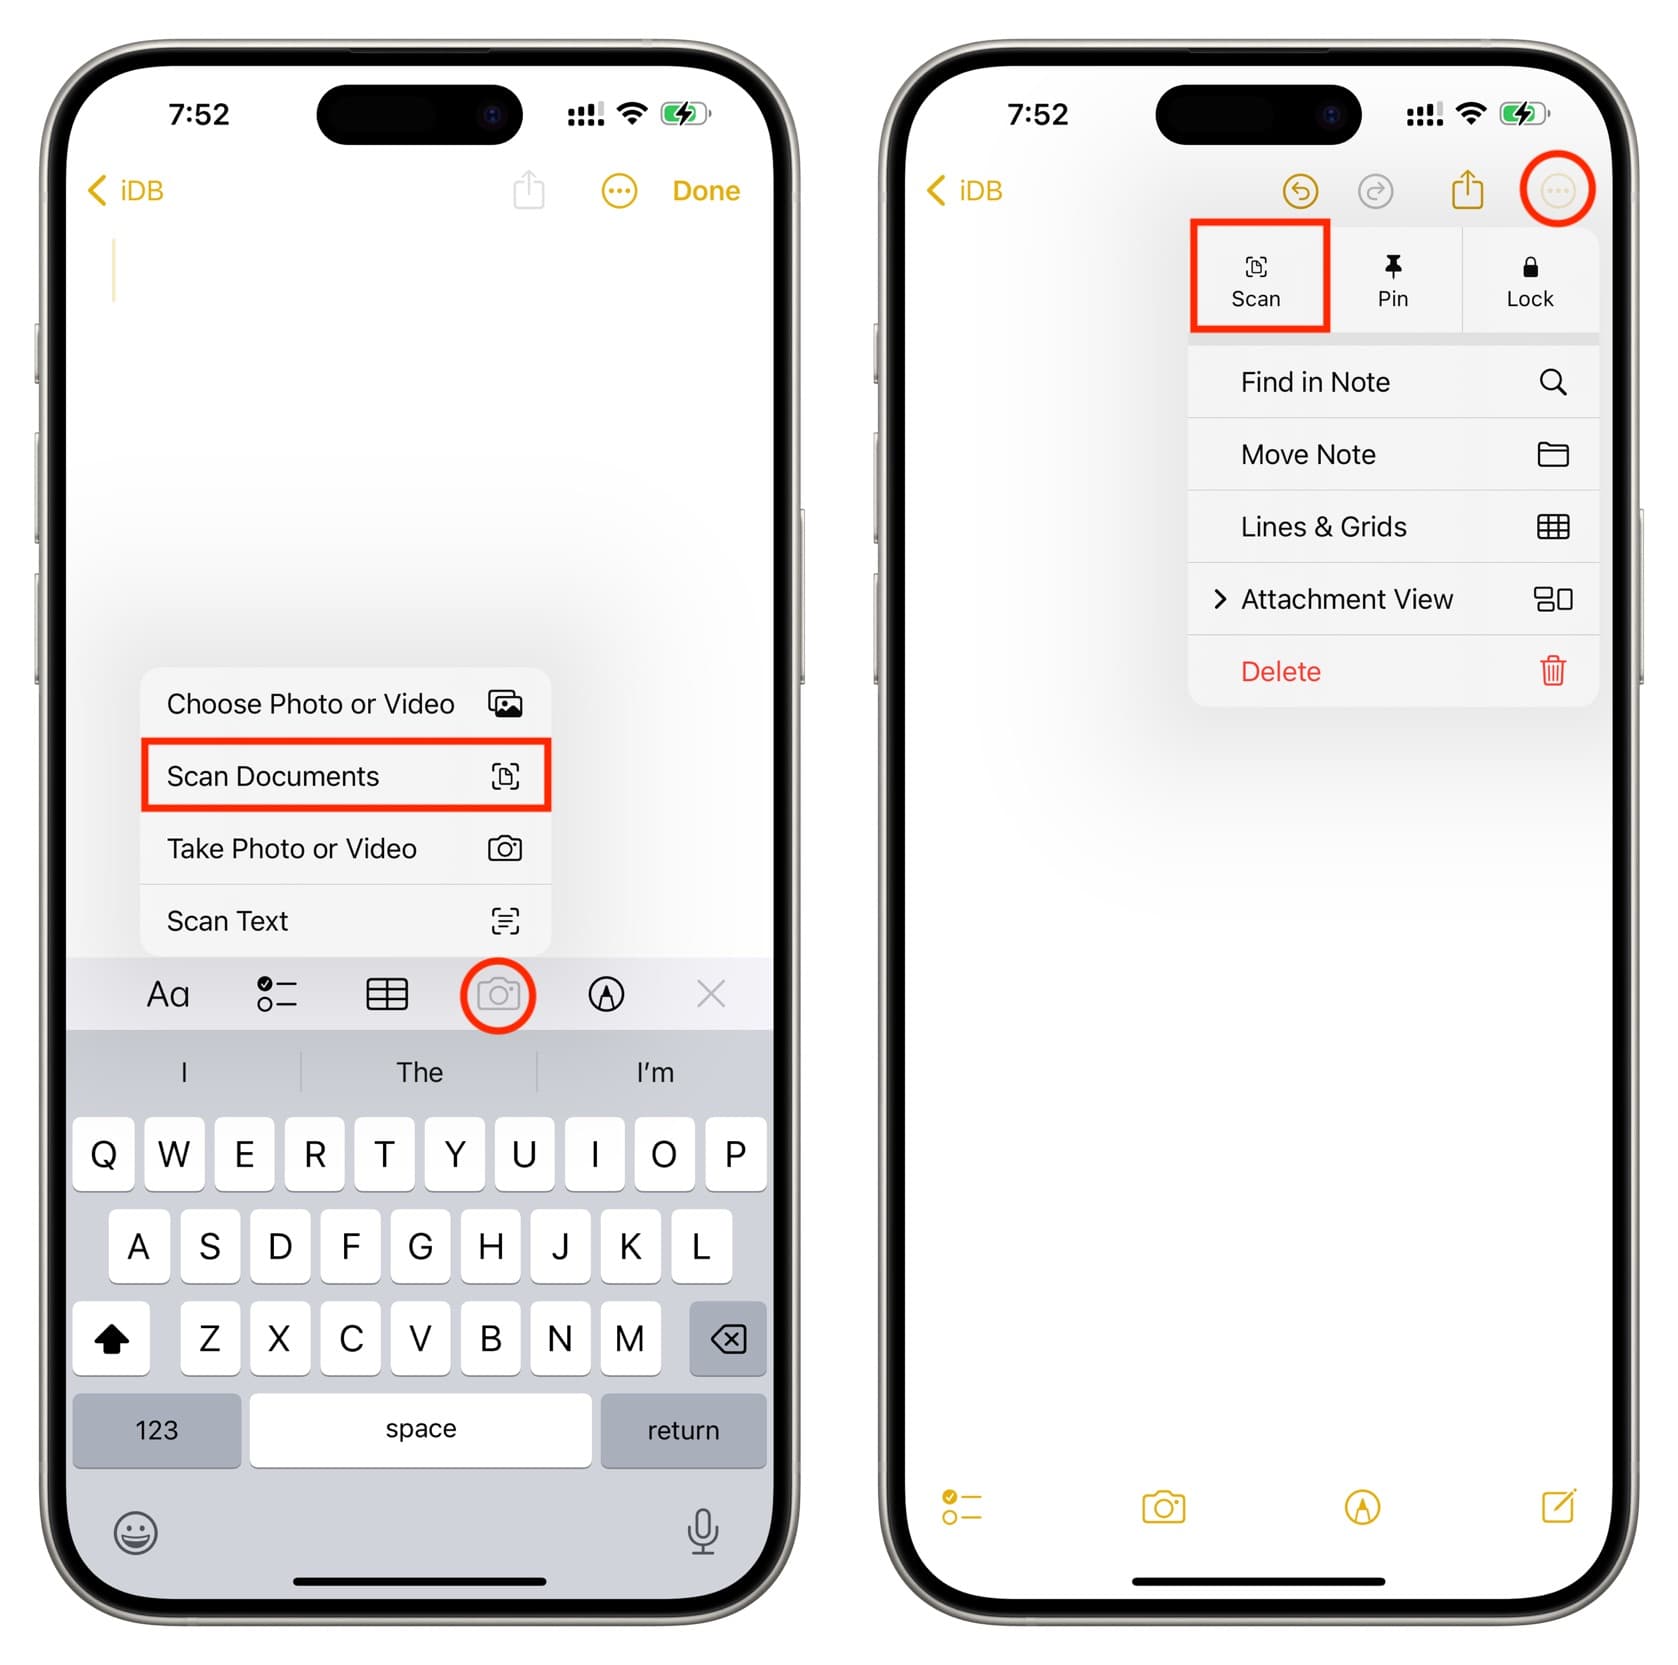
The Notes app offers the most feature-rich scanning experience on iPhone. It includes OCR support, multi-page PDF creation, annotation tools, and seamless sharing options.
Launch the Scanner in Notes
Open the Notes app on your iPhone and tap the compose button to create a new note. While editing the note, tap the paperclip icon above the keyboard to access the attachments menu. Select Scan Documents from the options and the camera will open automatically.
Position Your Document Correctly
Place your paper on a flat surface with even lighting. Hold your iPhone directly above the document, keeping it centered and parallel to the page. The screen will highlight the document edges in yellow when properly framed. Avoid shadows and glare, as these confuse the auto-detect feature.
Capture the Scan Automatically or Manually
When aligned correctly, your iPhone automatically captures the scan. If nothing happens after a few seconds, tap the shutter button manually. A preview appears with adjustable corner markers. Drag them if the detected area is off, then tap Keep Scan.
Apply Filters for Better Readability
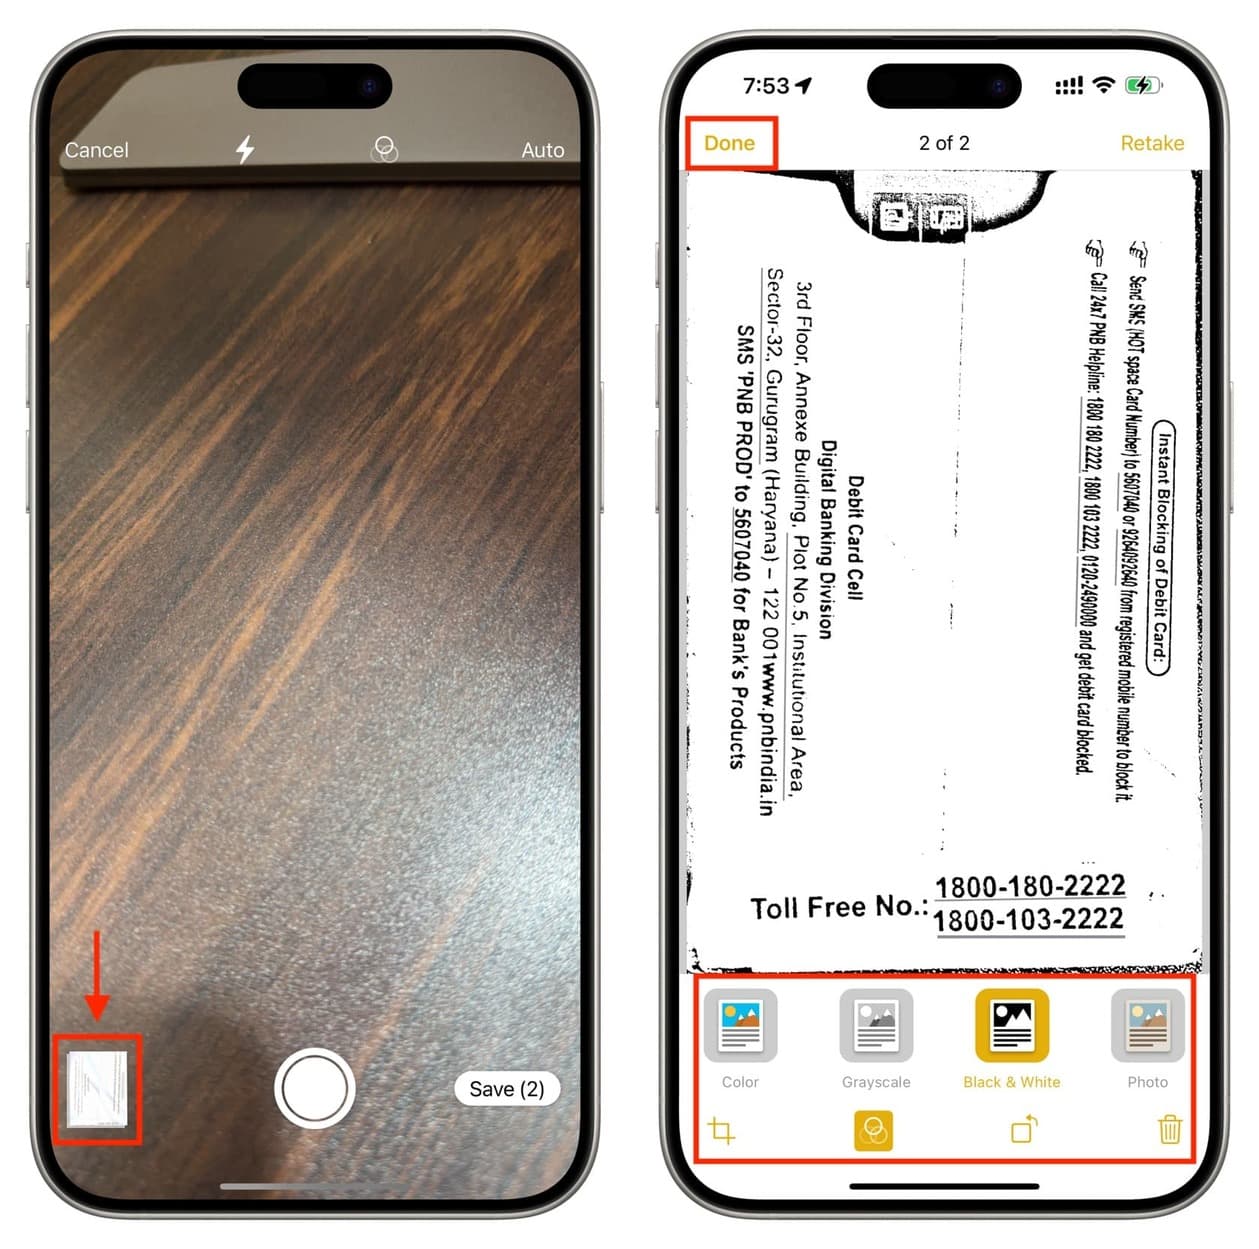
After capturing, tap the filter icon to enhance your scan. Choose Color for documents with stamps or colored text. Select Grayscale for balanced quality and smaller file size. Use Black and White for the crispest text clarity, which is ideal for OCR and archiving.
Add Multiple Pages to One PDF
Tap plus Scan to add another page to your document. Repeat the process for each page you need. Each new scan stacks into a single multi-page PDF. Before saving, drag thumbnails to reorder pages or tap the trash icon to delete unwanted ones.
Save and Edit Your Scan
Tap Save to embed the full scan in your note. From here, you can tap and hold text to copy it thanks to OCR. You can also use Markup tools to highlight, draw, or annotate directly on the scan.
Pro Tip: Use the Black and White filter for text-heavy documents. It boosts OCR accuracy and significantly reduces file size.
Scan Directly from the Files App
The Files app lets you save scanned documents directly to specific folders without opening Notes. This method is perfect for users who prefer folder-based organization.
Start Scanning in Any Folder
Open the Files app and navigate to your desired folder like iCloud Drive or Scans. Tap the three-dot menu in the top-right corner and select Scan Documents to launch the camera.
Save Directly as PDF
Scan as you would in Notes. After capturing, tap Keep Scan and add more pages if needed. Tap Save and the PDF is stored directly in your chosen folder with no extra steps required.
Understand the Limitations
Unlike Notes, the Files app scanner does not support OCR. You cannot search or copy text from the scan. There are also no built-in annotation tools. This method is best if you just need to save and organize PDFs without editing.
Best For: Users who want scans saved in specific folders without opening Notes first.
Access Scanner Through Control Center
Control Center offers the fastest way to access scanning. This shortcut skips navigation and launches the Notes scanner in under two seconds.
Add New Note to Control Center
Go to Settings, then Control Center. Scroll down and tap the plus sign next to New Note. Once added, you will see its icon when swiping down from the top-right corner of your screen.
Launch Scanner with One Long Press
Swipe down to open Control Center, then press and hold the New Note button. A menu pops up with Scan Documents, Create blank note, and Add sketch. Tap Scan Documents to jump straight into scanning without opening any app.
Why It Works: This method skips all navigation and launches the Notes scanner instantly.
Optimize Scan Quality Every Time
Good technique produces good scans. Follow these guidelines to ensure your documents are legible and searchable.
Use Proper Lighting
Natural light works best for scanning. Avoid backlighting from windows behind your document and strong overhead lights that create glare. If the environment is dark, toggle the Flash icon during scanning. Choose Auto for automatic flash, On for forced flash in low-light areas, or Off to prevent glare on glossy paper.
Keep Camera Steady and Level
Hold your iPhone parallel to the document. Tilting causes distortion and makes text hard to read. Wait for the auto-detection box to stabilize before capture. If you scan frequently, consider using a phone stand or mini tripod for consistent results.
Clean Your Camera Lens
A smudged lens causes blurry scans. Wipe the rear camera with a soft cloth before starting. This small step dramatically improves edge detection and text clarity.
Avoid Common Mistakes
Do not zoom in because the scanner needs the full page in frame. Keep your hand and body out of the shot to prevent shadows. Both issues interfere with auto-capture and reduce readability.
Share and Export Your Scanned PDFs
Once scanned, you need to get your PDF where it needs to go. Notes offers several sharing options.
Share from Notes Directly
Open the note with your scan and tap the scan preview. Tap the Share button to see your options. You can AirDrop to nearby Apple devices, Mail or Messages to send instantly, Save to Files for backup, or send to third-party apps like Google Drive or Dropbox.
Export PDF Using the Print Trick
To extract a clean standalone PDF, tap the scan, then Share, then Print. In the print preview, pinch outward on the thumbnail. Tap Share again and choose Save to Files or Email PDF. This method bypasses the note and creates a downloadable PDF perfect for attachments.
Save to Cloud or Print
From the Share sheet, you can also add scans to Reminders or Calendar, print directly to an AirPrint-enabled printer, or save to third-party apps like Evernote or OneNote.
Manage Multi-Page Scans Effectively
Building multi-page documents requires attention to order and quality before saving.
Combine Pages into One PDF
Both Notes and Files let you build multi-page documents. After the first scan, tap plus Scan to add more. All pages merge into a single PDF automatically.
Reorder or Delete Pages
Before saving, view the thumbnail strip at the bottom. Drag pages to reorder them or tap the trash icon to remove unwanted ones. Always review the sequence because it is harder to fix after saving.
Rename Your Scan
In Notes, tap above the scan to add a title like Lease Agreement or Expense Report. This makes it easier to find later via search.
Warning: Once saved, you cannot add more pages without starting a new scan.
Real-World Scanning Scenarios
Different documents call for different approaches. Here is how to handle common scanning situations.
Scan Receipts for Expenses
Use the Notes app with the Black and White filter. Enable OCR so you can search for receipt or office supplies later. After scanning, share via Mail or Save to Files in a dedicated tax folder.
Digitize Contracts or Forms
For legal documents, use the Files app to save directly to a secure iCloud folder. Apply the Grayscale filter to preserve the original appearance while reducing file size.
Study Printed Handouts
Scan class materials in Notes, then use OCR to copy text into flashcards or summaries. Annotate directly on the scan using the pen tool for highlighting key points.
Archive IDs and Passports
Store sensitive documents in a password-protected folder in Files. Avoid sharing these scans. Use local storage or encrypted cloud services for privacy.
Scan QR Codes Without Apps
Point your Camera app at any QR code. A notification banner appears. Tap it to open the link. You can also enable the QR scanner in Control Center for instant access.
Security Note: Never scan QR codes from unknown sources. They can lead to phishing sites or malware.
Native iPhone Scanner vs Third-Party Apps
The built-in scanner handles most tasks well, but third-party apps exist for specific needs.
What You Get for Free
The native scanner offers free use with no ads. You get OCR in Notes, multi-page PDFs, iCloud sync, and built-in markup and sharing tools. No downloads are required. Most users never need another app.
When to Try Third-Party Apps
Consider Genius Scan, TurboScan, or Dropbox if you need batch scanning of ten or more documents. You might also want direct Google Drive or OneDrive sync, enhanced sharpening or de-shadowing, or cross-platform access across Android and Windows.
User Insight: The native tools handle ninety percent of scanning tasks perfectly.
Fix Common Scanning Problems
Even with good technique, issues sometimes arise. Here is how to solve them.
Scanner Won’t Detect Edges
Ensure the entire document is visible and contrasts with the background. Use flash or move to better lighting. Avoid shiny surfaces because matte paper works best.
Blurry or Distorted Image
Clean your lens and hold the phone steady. Do not zoom. Keep the camera parallel to the page to prevent perspective warp.
Auto-Capture Not Working
Tap the shutter button manually. If it still fails, check for glare or poor contrast. Try switching to Black and White filter mode before scanning.
Text Not Searchable
Only the Notes app supports OCR. If text cannot be copied, you are likely using Files or a third-party app without OCR enabled.
Cannot Export as PDF
Use the pinch-out method in Print preview. This forces iOS to generate a standalone PDF for saving or emailing.
Key Takeaways for iPhone Scanning
Your iPhone is a full-featured scanner right out of the box. With the Notes app, you get OCR, searchable text, and markup capabilities. The Files app gives you direct file control and folder organization. Control Center unlocks instant scanning in seconds. No downloads, no cost, no hassle. Just point, scan, and go.
To scan successfully, choose your method based on your needs. Use Notes for OCR and editing, Files for direct folder saving, and Control Center for speed. Always apply the Black and White filter for text documents, keep your lens clean, and use even lighting. Enable the New Note shortcut in Control Center because it cuts your scanning time in half. With these tools and tips, you can digitize any document in seconds.
Frequently Asked Questions About iPhone Scanning
Does iPhone have a built-in document scanner?
Yes, iPhone has a built-in document scanner in the Notes app, Files app, and Control Center. No third-party apps are required for most scanning tasks.
How do I scan a document on iPhone for free?
Open Notes, create a new note, tap the paperclip icon, and select Scan Documents. Position your document under the camera and the iPhone will automatically capture it. This feature is completely free.
Can I scan multiple pages into one PDF on iPhone?
Yes. After scanning the first page, tap plus Scan to add more pages. All pages combine into a single multi-page PDF. You can reorder or delete pages before saving.
Does iPhone scanner have OCR?
Yes, but only in the Notes app. The OCR feature makes text searchable and selectable. You can copy text from scans and paste it elsewhere.
How do I export a scanned document as a PDF?
Open the scan in Notes, tap Share, then Print. In print preview, pinch outward on the thumbnail and tap Share again. Choose Save to Files or Email PDF.
Why is my iPhone scanner not detecting edges?
Ensure the document contrasts with the background and the entire page is visible. Use better lighting or enable flash. Avoid shiny surfaces and try holding the phone more parallel to the document.