Imagine you’re on the go, holding a signed contract, a receipt for expenses, or a stack of class notes—and suddenly need a digital copy. No scanner nearby? No problem. Your Android phone can do the job instantly. With built-in tools and powerful apps, how to use a scanner on Android has never been easier. You don’t need extra hardware—just your smartphone’s camera and the right method.
Android scanning turns physical documents into clean, shareable PDFs using intelligent features like edge detection, auto-crop, perspective correction, and OCR (Optical Character Recognition). Whether you’re a student, professional, or just organizing personal files, scanning on Android saves time and keeps important papers accessible. The most universal method? Google Drive’s free scanner—available on nearly every Android device. But alternatives like Adobe Scan, Microsoft Lens, and Genius Scan offer advanced tools for frequent users.
Scan Documents Using Google Drive
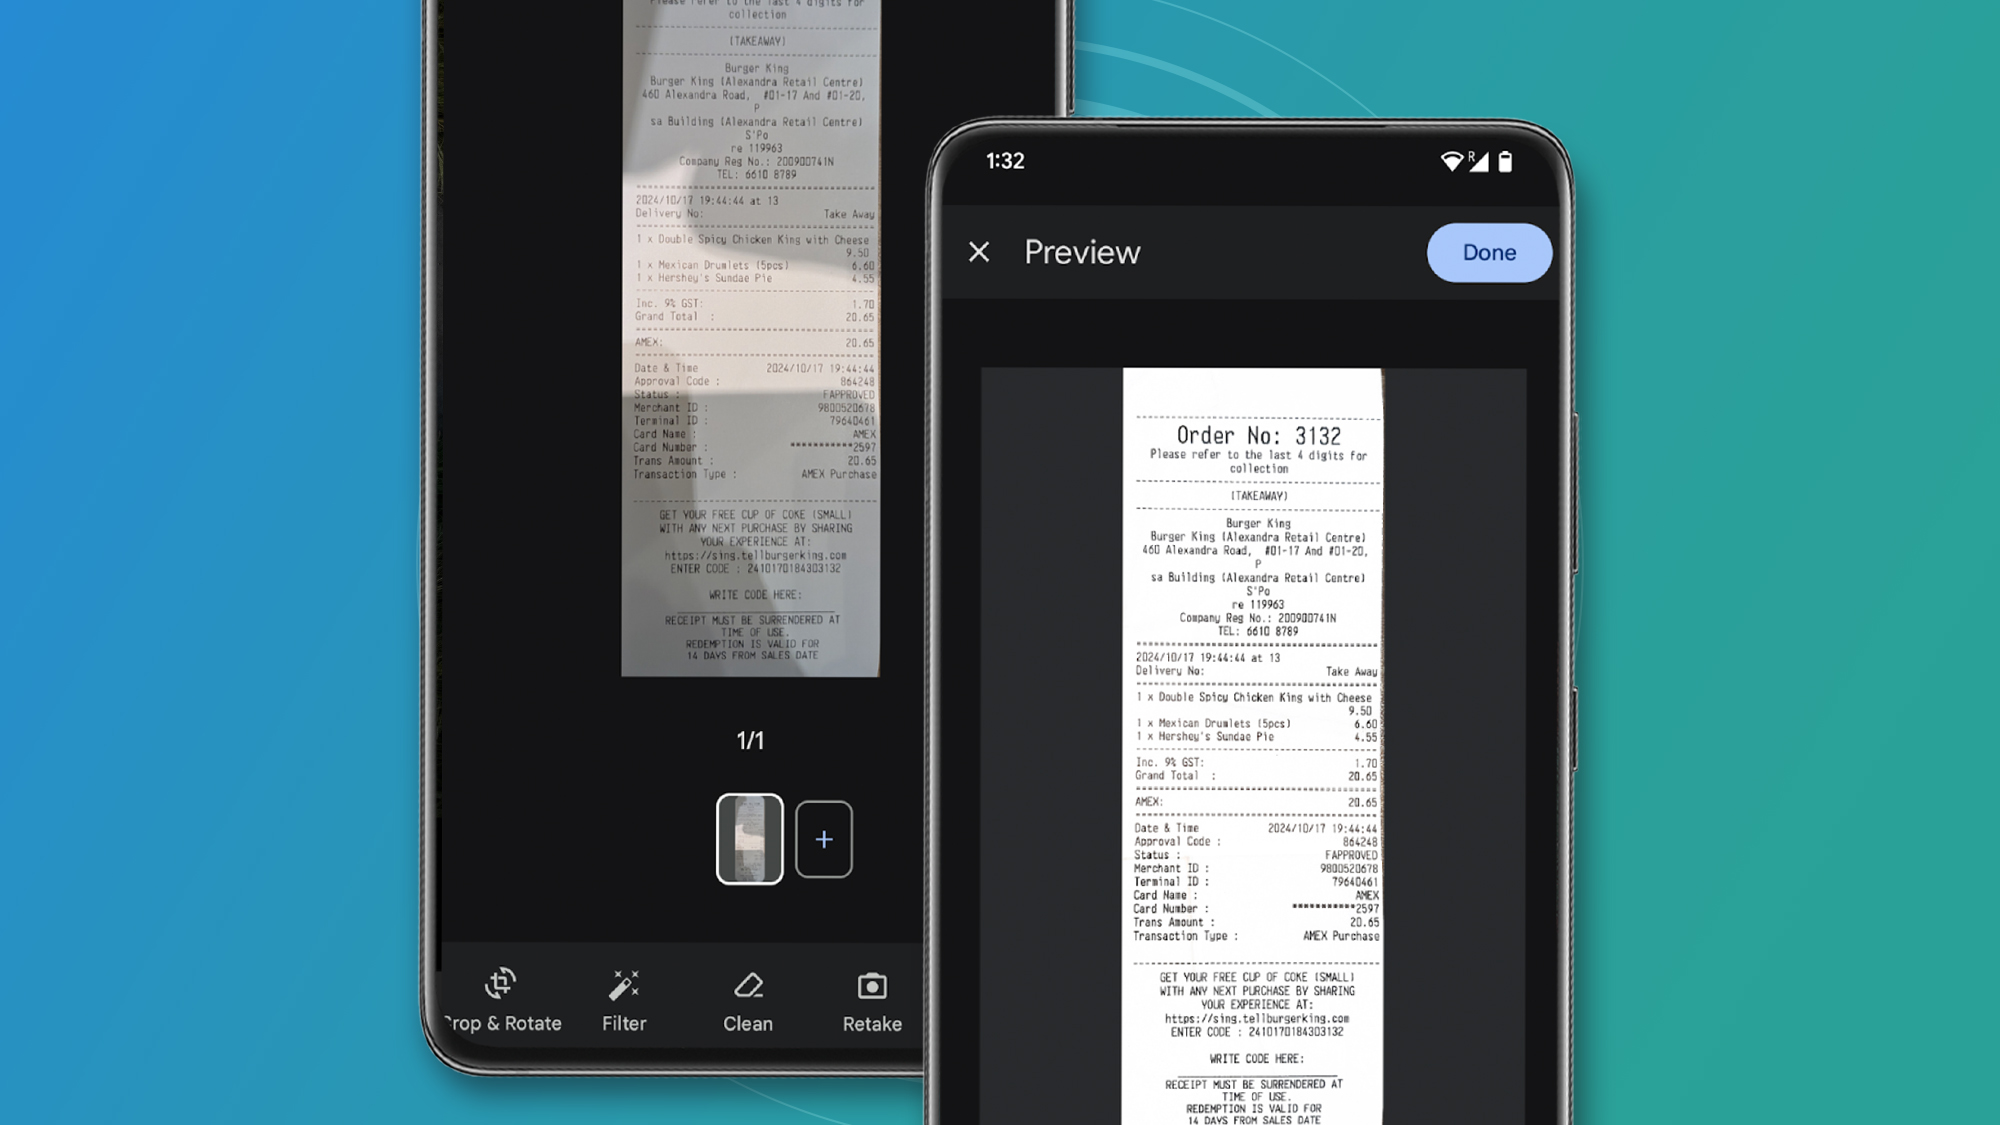
Google Drive is the go-to solution for most Android users. It’s pre-installed, free, and integrates seamlessly with your Google account. Best of all, it turns your phone into a smart scanner in seconds.
Open the Scan Tool in Drive
- Launch the Google Drive app (white icon with a colored triangle)
- Tap the “+” (Add) button at the bottom-right
- Select “Scan” from the menu
- Allow camera access if prompted
Pro Tip: If you don’t see “Scan,” update Google Drive from the Play Store—older versions may lack the feature.
Capture a Clear Document Image
Place the document on a flat, dark surface for contrast. Hold your phone directly above the page, avoiding shadows. Let the app detect edges—white corners will appear automatically. Tap the shutter button (large circle) to capture.
Visual Cue: The app highlights the detected document area. If corners aren’t accurate, manually adjust them after capture.
Edit and Save Your Scan
After taking the photo, drag corner markers to fine-tune the crop. Tap Done to confirm. Tap the “+” button again to add more pages for multi-page documents. Rename the file (e.g., “Invoice_May2024”) and choose a folder under Location. Tap Save.
Auto-Save: Files save instantly to Google Drive and sync across devices.
Use Samsung Galaxy’s Built-in Camera Scanner
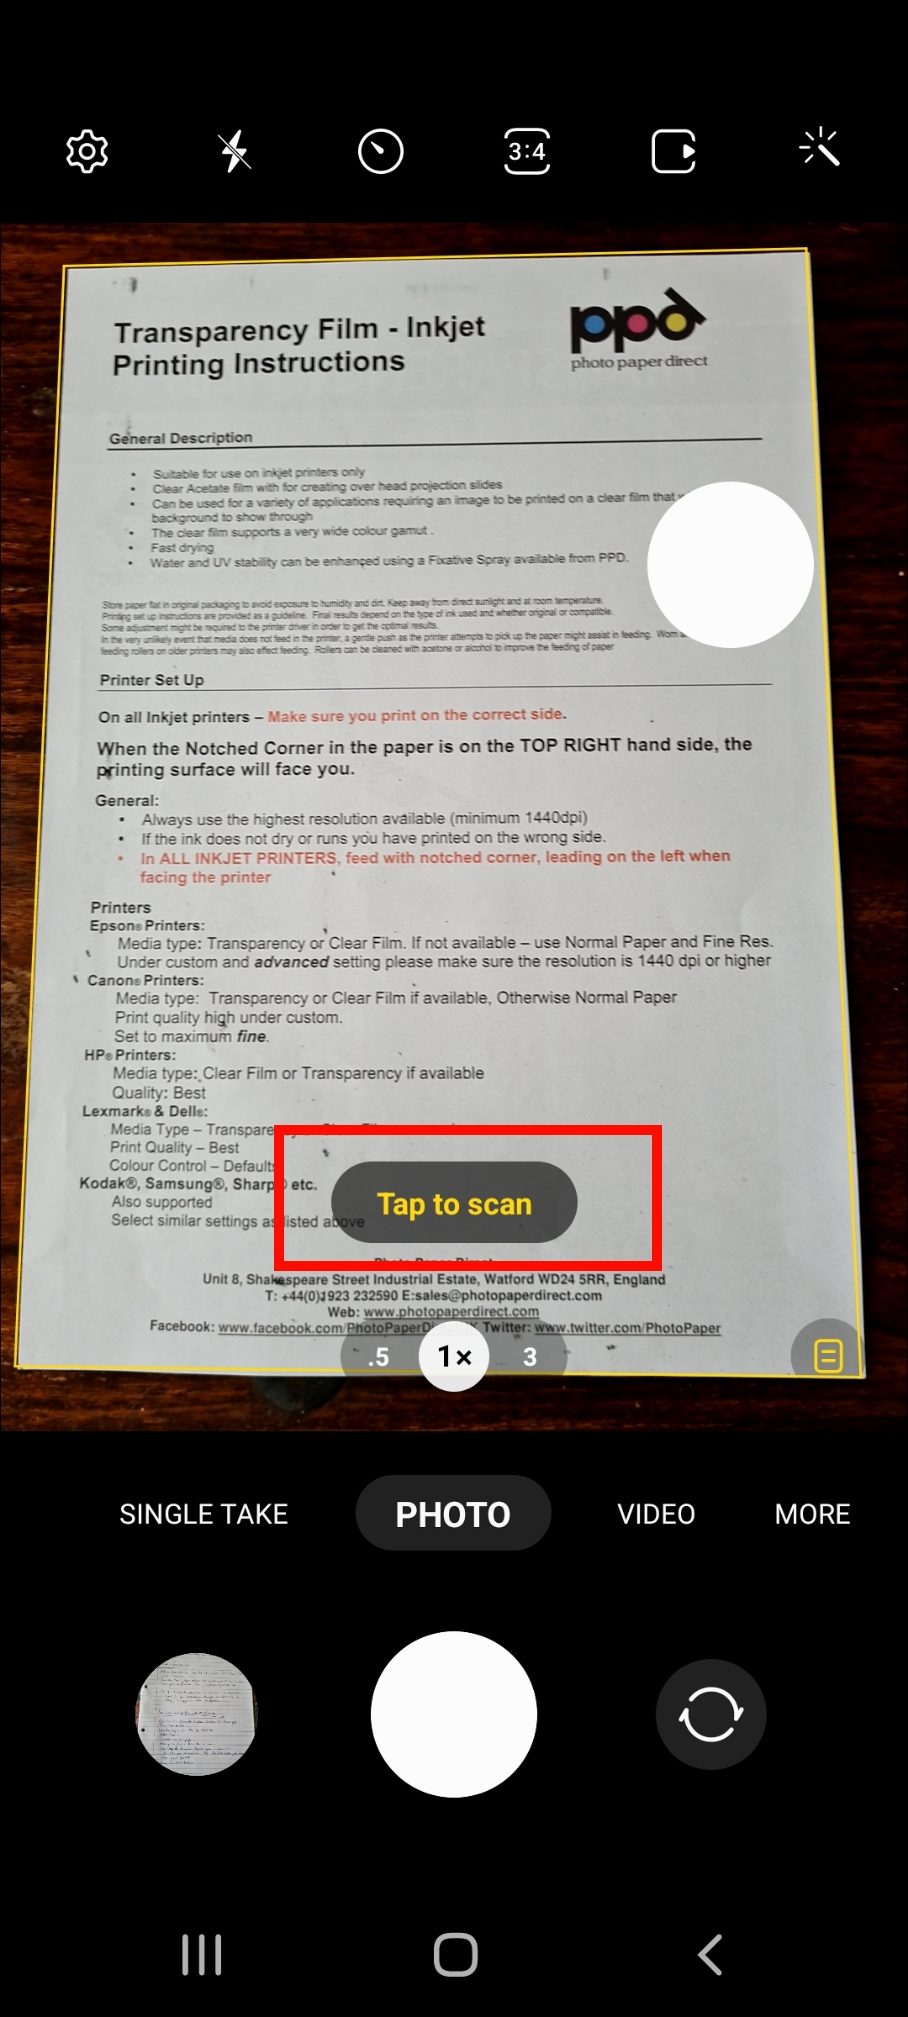
If you own a Samsung Galaxy phone, you may not need any app. Many models include a native scanning feature right in the default Camera app.
Activate Camera Scan Mode
- Open the Camera app
- Point it at a document on a flat surface
- Wait for the “Scan” prompt to appear near the document
- Tap Scan to capture
- The image saves to your Gallery or My Files
Edge Detection: A blue outline shows the detected area—tap to confirm or adjust.
Limitation: This feature varies by model and region. Not available on all Galaxy devices.
Edit and Export as PDF
From your Gallery, open the scanned image. Tap Edit or More. Select Convert to PDF (if supported). Share or save the file.
Best For: Quick scans without downloading extra apps.
Choose the Best Third-Party Scanning App
For more control, better OCR, or frequent scanning, third-party apps outperform built-in tools. Here are the top three.
Use Adobe Scan for Professional Results
Adobe Scan delivers high-quality, editable scans with powerful cloud integration.
Key Features
• Auto-edge detection and perspective fix
• OCR for searchable, extractable text
• Save to Adobe Cloud, Google Drive, Dropbox, or OneDrive
• Password-protect sensitive files
• Works offline
How to Scan with Adobe Scan
- Install Adobe Scan from the Play Store
- Open, grant camera access
- Capture document—auto-detection works instantly
- Adjust crop, apply filters (B&W, grayscale)
- Tap Save
- Choose export destination
Best For: Contracts, receipts, invoices, and business documents
Try Microsoft Lens for Office Users
Microsoft Lens is ideal for students and professionals in the Microsoft ecosystem.
Why Use It
• Special modes: Document, Whiteboard, Business Card, Photo
• OCR extracts text for Word or PowerPoint editing
• Direct save to OneDrive, SharePoint, or local storage
• Export as PDF, DOCX, PPTX, or image
Quick Workflow
- Install Microsoft Lens PDF Scanner
- Open, allow camera access
- Position document
- Tap Capture
- Tap Finish
- Choose: Save to Gallery, Share, or Export to Word
Perfect For: Lecture notes, whiteboard captures, student handouts
Pick Genius Scan for Field Work
Genius Scan is a favorite among real estate agents, sales reps, and field technicians.
Standout Features
• Fast, one-tap scanning
• Batch process multiple pages
• Auto-upload to Google Drive, Dropbox, Evernote
• Password lock for confidential docs
• Custom workflows (e.g., auto-send to folder)
How to Use
- Install Genius Scan from Play Store
- Open, point at document
- Tap Capture
- Apply filter (Black & White, Color, Grayscale)
- Tap Done
- Share, save, or export
Ideal For: On-site reports, lease agreements, inspection forms
Compare Scanning Methods Side by Side

Not all scanning tools are equal. Choose based on your needs.
Feature Comparison Table
| Feature | Google Drive | Adobe Scan | Microsoft Lens | Genius Scan |
|---|---|---|---|---|
| OCR Search | Yes (in Drive only) | Yes (extractable) | Yes (editable) | Yes (premium) |
| Multi-Page PDF | Yes | Yes | Yes | Yes |
| Export Formats | PDF only | PDF, JPEG, PNG | PDF, DOCX, PPTX | PDF, JPEG |
| Cloud Options | Google Drive only | Multiple | OneDrive, Google | Multiple |
| Offline Use | No | Yes | Yes | Yes |
| Text Editing | No | No (but copy) | Yes (via Word) | No |
Bottom Line: Use Google Drive for simple, free scans. Choose Adobe Scan or Microsoft Lens for OCR and editing. Pick Genius Scan for speed and workflow automation.
Fix Common Scanning Problems on Android
Even the best tools fail sometimes. Here’s how to solve frequent issues.
Document Edges Not Detected
Cause: Poor lighting, low contrast, or glare
Fix:
• Use a dark table for white paper
• Avoid shadows—scan under natural light
• Clean your camera lens
• Manually adjust corners after capture
Scan Is Blurry or Crooked
Cause: Shaky hands, tilted angle, or dirty lens
Fix:
• Hold phone parallel to the document
• Use both hands or rest elbows
• Tap screen to manually focus
• Wipe lens with a microfiber cloth
Text Isn’t Searchable
Cause: Weak OCR or app limitations
Fix:
• Use Adobe Scan or Microsoft Lens for reliable OCR
• Ensure text is high-contrast and legible
• Avoid scanning handwritten notes with messy writing
App Crashes During Use
Cause: Outdated app, low memory, or corrupted cache
Fix:
• Update the app via Google Play Store
• Go to Settings > Apps > [App Name] > Storage > Clear Cache
• Restart your phone
Follow Best Practices for Clear, Professional Scans
Get professional results every time with these pro tips.
Optimize Lighting and Contrast
Use natural light near a window. Avoid direct sunlight (causes glare). Place white paper on a dark surface (e.g., black notebook). Turn off flash—ambient light works better.
Position Your Phone Correctly
Hold camera perpendicular to the document. Keep steady—use both hands. Ensure the entire page fits in the frame. Avoid curved or folded paper.
Review Before Saving
Rotate if needed. Crop out blank edges. Check that all text is visible. Rename file clearly (e.g., “Passport_Copy.pdf”).
Pro Tip: For OCR success, scan printed text on clean, flat paper with no shadows.
Organize and Share Your Scanned Files
A great scan is useless if you can’t find it. Manage files like a pro.
Save to the Right Location
• Google Drive: Best for searchability and sync
• OneDrive: Ideal for Microsoft users
• Local Storage: Use for quick sharing or backups
• Cloud Links: Generate shareable links with view/edit permissions
Share Scanned PDFs Easily
Via Gmail
- Open Gmail → Tap Compose
- Tap paperclip → Attach file
- Select from Drive, Gallery, or Downloads
- Send
Other Options
• WhatsApp/Telegram: Attach as file
• Nearby Share: Transfer without internet
• USB Cable: Copy to computer
• Print: Use Google Cloud Print or native Android printing
Naming Tip: Use clear names like “Lease_Agreement_Jones.pdf” for easy tracking.
When to Use a Dedicated Scanner Instead
Smartphone scanning is powerful—but not always enough.
Choose a Dedicated Scanner If You
• Scan 20+ pages daily
• Need archival-quality resolution (600+ DPI)
• Require batch feeding (auto-document feeders)
• Work in legal, medical, or government fields
Smartphone vs Desktop Scanner
| Feature | Android Phone | Dedicated Scanner |
|---|---|---|
| Portability | Excellent | Poor |
| Speed | 5–10 sec/page | 20–40 ppm |
| OCR Accuracy | Good (app-dependent) | Excellent |
| Cost | Free (built-in) | $100–$500 |
| Best For | Occasional use | High-volume needs |
Recommendation: Use your phone for mobility. Invest in a Fujitsu ScanSnap or Brother ADS series for office use.
Key Takeaways for Android Document Scanning
Knowing how to use a scanner on Android turns your phone into a productivity powerhouse. Google Drive offers the easiest entry point—free and built-in. For more features, Adobe Scan, Microsoft Lens, and Genius Scan deliver professional results. Follow best practices for lighting, positioning, and file management, and you’ll create clean, searchable, shareable PDFs anytime, anywhere.
Whether you’re submitting a job application, saving a receipt, or archiving a contract, your Android phone is all the scanner you need—for most tasks. Save the desktop scanner for high-volume work, and let your phone handle the rest.
Frequently Asked Questions About How to Use a Scanner on Android
Does every Android phone have a built-in scanner?
Most Android phones don’t have a dedicated scanner app, but Google Drive (pre-installed on nearly all devices) includes a free scanning tool. Samsung Galaxy phones also offer native scanning through their Camera app on many models.
Is scanning on Android free?
Yes. Google Drive’s scanner is completely free. Third-party apps like Adobe Scan and Microsoft Lens offer free versions with optional premium upgrades. Google Drive provides 15 GB of free storage shared across Gmail, Photos, and Drive.
Can I scan multiple pages into one PDF on Android?
Yes. Google Drive, Adobe Scan, Microsoft Lens, and Genius Scan all support multi-page PDF creation. In Google Drive, tap the “+” button after each page to add more scans before saving.
How do I make scanned text searchable?
Use apps with OCR (Optical Character Recognition). Google Drive applies OCR automatically for search within PDFs. For extractable, editable text, use Adobe Scan or Microsoft Lens—they allow you to copy, search, and export text from scanned documents.
Why is my scan blurry or not detecting edges?
Blurry scans usually result from camera movement, dirty lens, or poor focus. Clean your lens with a microfiber cloth, hold the phone steady with both hands, and tap the screen to manually focus. Edge detection fails with poor lighting or low contrast—use natural light and place white paper on a dark surface.
Can I scan documents offline on Android?
Google Drive requires an internet connection to save scans to the cloud. However, Adobe Scan, Microsoft Lens, and Genius Scan support offline scanning—they capture documents without internet and sync later when connected.