Connecting a scanner to your computer can feel overwhelming if you are unsure of the proper steps. Many users struggle with driver installation, connection issues, or wireless configuration, especially when using different scanner brands like Brother, HP, Epson, or CZUR. This guide walks you through exactly how to set up a scanner to a computer, whether you are using a USB flatbed model or a wireless document digitizer. You will learn how to verify compatibility, install drivers, connect via USB or Wi-Fi, configure scan settings, and troubleshoot common problems.
By the end of this article, you will have a fully functional scanner ready to digitize documents, photos, or books for work, school, or home organization. We cover Windows and macOS setups, manufacturer-specific software, and expert tips for achieving the best scan quality.
Check Scanner and Computer Compatibility First
Before purchasing or connecting a scanner, confirm that your model supports your operating system. This prevents wasted time on incompatible hardware and ensures smooth driver installation.
Verify Operating System Support
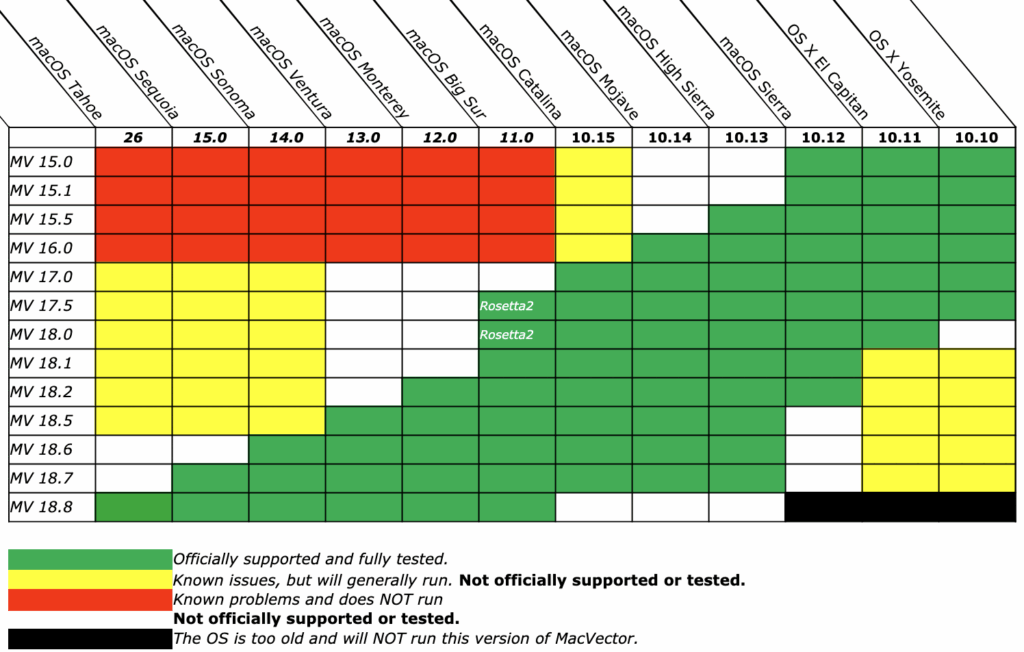
Visit the scanner manufacturer’s website and search for your specific model to confirm OS compatibility. Most modern scanners support Windows 10 or Windows 11, along with macOS versions like Monterey, Ventura, or Sonoma. Older scanner models may lack support for newer operating systems without updated drivers. For example, the CZUR ET Max supports Windows 7 through 11 and macOS 10.12 through 14, while the Brother DS940DW works with Windows 11 and macOS 13 and later. Always check this information before proceeding with setup.
Update Your Computer Operating System
An outdated operating system can block driver installation or prevent your computer from detecting the scanner. On Windows, open Settings, go to Windows Update, and install all pending updates. On macOS, click the Apple menu, select System Settings, choose General, and click Software Update. Completing these updates before connecting your scanner ensures the best compatibility and access to built-in scanning tools.
Prepare Your Scanner for Connection
Proper physical preparation prevents connection failures and ensures reliable performance from day one.
Power On and Position the Scanner
Locate the DC power input on your scanner and connect the AC adapter to a wall outlet. Desktop scanners require external power, while portable models may draw power directly from your computer via USB. Place both the scanner and your computer on a flat, stable surface with enough room for the lid to open on flatbed models or for ADF access on document feeders. Ensure adequate ventilation and clear cable routing paths.
Identify Your Connection Type
Scanners connect using one of four methods. USB wired connections offer plug-and-play simplicity and the most reliable performance for home users. Wi-Fi wireless connections enable scanning from multiple devices without cables. Ethernet connections are used in office networks for shared scanner access. Wi-Fi Direct allows direct device-to-device connection without a router. Gather the appropriate cables or your Wi-Fi network name and password before beginning setup.
Install Scanner Drivers Before Connecting
Some scanners require their software installed before the computer can detect them. Downloading drivers from the manufacturer ensures you have the latest version with full feature access.
Download Drivers from Manufacturer Websites
Always obtain drivers from the official manufacturer support portals rather than relying on operating system auto-detection. Visit Brother support at support.brother.com, HP at hp.com, Epson at epson.sn, or CZUR at czur.com. Search for your exact model number and select the version matching your operating system. Choose the Full Driver and Software Package rather than basic drivers alone to access OCR, scanning applications, Wi-Fi setup tools, and firmware updaters.
Why Updated Drivers Matter
Using outdated or incorrect drivers causes scanning failures, software crashes, or missing features. The full software package includes everything needed for optimal performance, including batch scanning, cloud saving, and image enhancement tools. Installing this software before connecting the scanner physically prevents detection issues on many models, particularly CZUR devices.
Connect Your Scanner via USB
USB remains the fastest and most reliable connection method for most home users. This direct wired connection requires minimal configuration.
Plug In the Scanner
Use a USB 2.0 or higher cable appropriate for your model. Micro USB cables work with Brother devices, while Macs with USB-C ports may need a USB-A to USB-C adapter. Connect one end to the scanner and the other to an available USB port on your computer. Power on the scanner after making the connection. Windows will display a “Device Ready” notification, while macOS may show detection in System Settings under Printers and Scanners.
Note for Certain Models
Some scanners like the CZUR ET Max require their software installed before the device appears in your computer’s scanner list. If your scanner does not appear immediately, install the manufacturer software first, then reconnect the USB cable.
Set Up Scanner on Windows
Windows 10 and 11 include built-in tools for adding and configuring scanners. Follow these steps to complete your setup.
Add Scanner Through Settings
Open Start and click Settings, then navigate to Bluetooth and devices. Select Printers and scanners and click Add a printer or scanner. Wait for Windows to search for available devices. When your scanner appears in the list, select it and click Add device. Approve any User Account Control prompts that appear during installation. If your scanner does not appear, proceed to manual driver installation.
Manual Driver Installation via Device Manager
If Windows fails to detect your scanner automatically, open Device Manager by pressing Win and X together and selecting it from the menu. Look under Imaging Devices or Other Devices for an unknown device. Right-click the device, choose Update driver, and select Browse my computer for drivers. Navigate to the folder where you extracted your downloaded driver package and complete the installation.
Set Up Scanner on macOS
macOS uses built-in drivers and the Image Capture application for most scanner models. The setup process differs slightly depending on your macOS version.
Add Scanner in System Settings
Click the Apple menu and select System Settings on macOS Ventura and later. Go to Printers and Scanners in the left sidebar. If your scanner appears in the list, it is ready to use. If not, click the Add Printer, Scanner, or Fax button to manually add the device. Select your scanner from the available devices and click Add. Older macOS versions use System Preferences instead, accessible from the Apple menu.
Use Image Capture or Preview
Open Image Capture from Spotlight or Launchpad to scan immediately. Alternatively, open Preview, go to File, and select Import from Scanner to access your device. Both applications work with built-in macOS drivers for basic scanning needs.
Configure Wireless Scanner Connection

Wireless setup enables scanning from laptops, tablets, and phones without physical cable connections. This method works well for shared office environments.
Ensure Both Devices Share the Same Network
Your scanner and computer must connect to the same Wi-Fi network for discovery and communication. Avoid connecting to different frequency bands, as this causes connection failures. Ensure both devices use either 2.4 GHz or 5 GHz consistently.
Use Wi-Fi Direct for Direct Connections
Wi-Fi Direct available on Brother, HP, and Epson models enables direct connection between scanner and device without a router. This proves ideal for temporary setups or mobile scanning where network infrastructure is unavailable. Set up Wi-Fi Direct through the scanner’s control panel or accompanying mobile app.
Assign a Static IP Address
DHCP-assigned IP addresses can change, breaking your connection. Access your scanner’s network settings through its control panel or software. Disable DHCP and manually enter a static IP address within your network range, along with the subnet mask and gateway address. This ensures consistent scanner identification on your network.
Position Documents and Start Scanning
Proper document placement directly affects scan quality and readability.
Flatbed Scanner Placement
Place your document face down on the glass surface. Align the top-left corner with the triangle or arrow marker near the scanning area. Close the lid gently to prevent movement during scanning. Ensure the glass is clean before placing documents for the best results.
Automatic Document Feeder Usage
Open the ADF cover and insert pages face up with the top edge of the first page facing left. Slide the stack gently into the feeder until it engages. Use alignment guides to prevent skewing. The ADF handles multi-page documents efficiently but struggles with stapled, wrinkled, or thick paper.
Optimize Scan Settings for Best Results

Choosing the right settings balances quality with file size and ensures usable output.
Select the Appropriate File Format
| Format | Best Use Case |
|---|---|
| Multi-page documents, contracts, forms | |
| Searchable PDF | Text you can select and copy |
| JPEG | Photos and images |
| PNG | High-quality graphics |
| TIFF | Archival, lossless storage |
| Word (docx) | Editable text output |
Choose Color Mode and Resolution
Select Color mode for photos and colored documents. Use Grayscale for black-and-white documents with shading like signatures. Black and White mode produces the smallest files for text-only pages. For resolution, 150 to 200 DPI works for email and web sharing. Use 300 DPI for standard documents and archiving. Increase to 600 DPI for small text, handwriting, or book pages. Reserve 1200 DPI for high-detail archival work, as file sizes grow significantly.
Enable Image Enhancements
Improve scan quality by enabling features like Auto-Crop to remove blank edges, Background Cleanup to eliminate shadows, Descreening to remove printed dot patterns, and OCR for searchable text. CZUR scanners offer Curve Flattening to correct book spine distortion when scanning bound documents.
Troubleshoot Common Scanner Issues
Most scanner problems have simple solutions you can implement immediately.
Scanner Not Detected
If your computer fails to recognize the scanner, the driver may be missing or the USB cable could be faulty. Try reinstalling drivers manually through Device Manager on Windows or System Settings on macOS. Test different USB ports or replace the cable with an original manufacturer cable.
Wi-Fi Scanner Not Connecting
Wireless scanners often fail to appear when they are on a different network than your computer. Verify both devices connect to the same Wi-Fi network. Restart your router and reconnect the scanner to the network. For persistent issues, assign a static IP address to maintain consistent connectivity.
Poor Scan Quality
Blurry or unclear scans usually result from low resolution settings or a dirty scanner glass. Increase your DPI setting for sharper output. Clean the glass surface with a soft, lint-free cloth and manufacturer-approved cleaner. Ensure documents lie flat against the glass without wrinkles or folds.
Software Crashes or Freezes
Outdated scanning software conflicts with newer operating systems. Update your scanning application through the manufacturer website. Also update your computer’s operating system to the latest version. Reinstall the software completely if problems persist.
Frequently Asked Questions About Setting Up a Scanner
Why is my scanner not showing up on my computer?
Your scanner may not appear because drivers are missing, the USB connection is faulty, or the scanner requires software installed before detection. Try installing the manufacturer software first, then manually install drivers through Device Manager on Windows or check System Settings on macOS.
Do I need to install drivers for every scanner?
Yes, installing the correct drivers ensures your computer recognizes the scanner and provides access to all features. While operating systems include basic drivers for some scanners, manufacturer drivers offer full functionality including OCR, batch scanning, and cloud integration.
Can I connect a scanner wirelessly to multiple computers?
Wireless scanners can connect to multiple devices on the same network, though only one device can scan at a time. Ensure all computers are on the same Wi-Fi network and the scanner is properly configured for network access.
What is the best resolution for scanning documents?
For standard documents and archiving, 300 DPI provides the best balance of quality and file size. Use 600 DPI for documents with small text or handwriting. Reserve higher resolutions like 1200 DPI for photos or detailed archival work where large file sizes are acceptable.
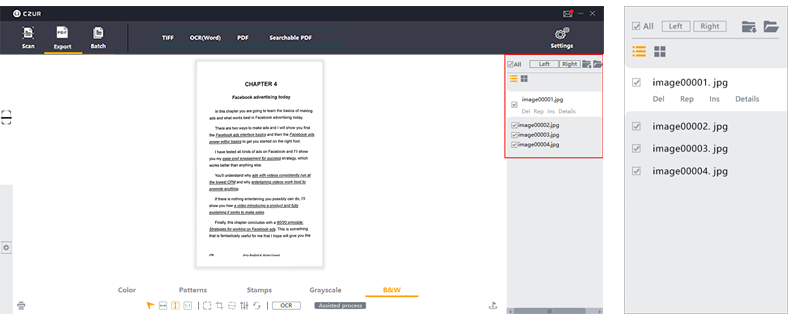
How do I scan documents to PDF?
Open your scanning software and select PDF as the output format. For searchable PDF output with selectable text, enable OCR in your scan settings. Place your document, click Scan, and choose a save location. The resulting PDF contains your document pages in a single file.
Why does my scanner work with USB but not Wi-Fi?
Wi-Fi connectivity issues typically stem from network configuration problems. Ensure both scanner and computer connect to the same network. Check that firewall settings allow communication between devices. Consider assigning a static IP address to prevent connectivity drops.
Key Takeaways for Setting Up Your Scanner
Successfully setting up a scanner to a computer requires verifying compatibility, installing proper drivers, and choosing the right connection method for your needs. USB connections offer the most reliable setup for home users, while Wi-Fi configuration enables flexible scanning from multiple devices across your network. Always download the full software package from the manufacturer rather than relying on basic operating system drivers.
Take time to configure scan settings appropriately for your documents, selecting the correct resolution, color mode, and file format. Regular maintenance including cleaning the glass and updating drivers ensures consistent performance. With your scanner properly set up, you can digitize documents efficiently for filing, sharing, or archiving.