If you’ve ever needed to diagnose a brain injury, joint damage, or internal tumor, your doctor may have ordered an MRI scan. But what exactly happens inside that large, tube-like machine? Unlike X-rays or CT scans, magnetic resonance imaging (MRI) does not use radiation. Instead, it harnesses powerful magnets, radio waves, and the natural properties of hydrogen in your body to create incredibly detailed images of soft tissues, organs, and bones. Understanding how an MRI scanner works reveals a blend of quantum physics and advanced engineering, all designed to see inside the human body without a single incision.
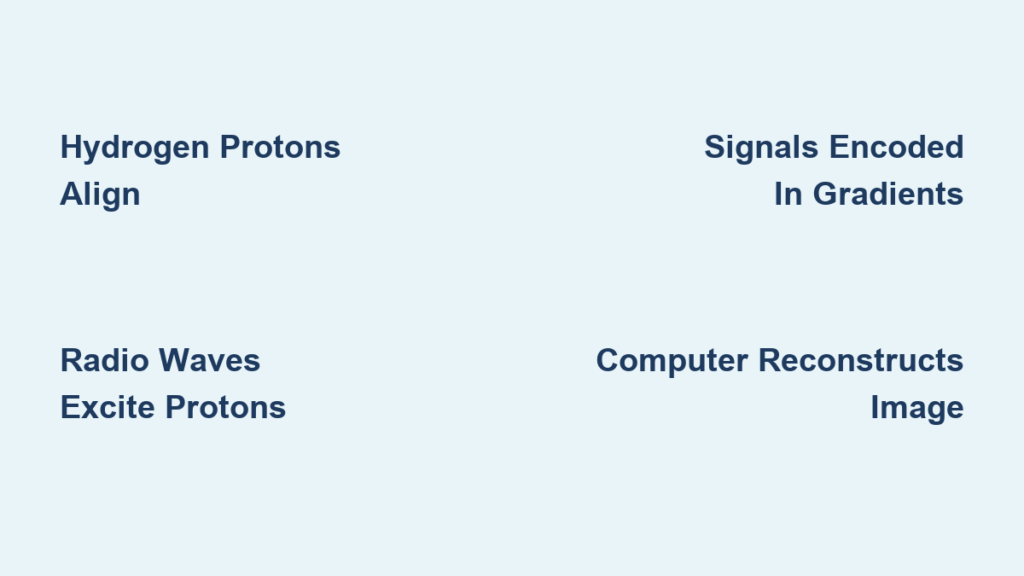
The process starts with the most abundant element in your body: water. Since you’re about 60% water and each water molecule contains hydrogen atoms, MRI targets the tiny magnetic properties of hydrogen protons. When exposed to a massive magnetic field, these protons align and can be manipulated with radiofrequency pulses. As they return to their normal state, they emit signals that the scanner detects and converts into high-resolution cross-sectional images. In this guide, we’ll break down every step from magnetization to image reconstruction, explain how different tissue contrasts are created, and explore what makes MRI safe, loud, and increasingly intelligent.
Hydrogen Protons: The Tiny Magnets Inside Your Body
The human body is roughly 60% water by weight, and every water molecule carries two hydrogen atoms. Each hydrogen nucleus contains a single proton that behaves like a tiny magnet due to a quantum property called spin. Normally, these protons point in random directions, creating no detectable signal.
When you enter an MRI scanner, the main magnetic field forces these protons to align either parallel (low energy) or anti-parallel (high energy) to the field direction. Slightly more protons align parallel, creating a net magnetic vector along the scanner’s axis. This alignment happens within seconds, and you feel nothing. Yet this moment marks the foundation of every MRI image ever captured.
The strength of this magnetic field, measured in teslas (T), directly determines image quality. Most clinical scanners operate at 1.5 T or 3 T, while research facilities push toward 11.7 T. Higher field strength means more protons align, producing a stronger signal and enabling finer resolution. However, ultra-high-field scanners also introduce challenges like increased artifacts and stricter safety requirements.
The Larmor Frequency: Why Radio Waves Matter in MRI
Each hydrogen proton wobbles (precesses) at a specific frequency determined by the magnetic field strength. This is the Larmor frequency, and it follows a precise mathematical relationship: at 1.5 T, hydrogen resonates at approximately 64 MHz, which falls within the FM radio range.
The MRI scanner exploits this resonance by sending precisely tuned radiofrequency (RF) pulses at the Larmor frequency. When the RF pulse matches this frequency, protons absorb energy and flip into a higher-energy state, tipping their net magnetization away from the longitudinal axis and into the transverse plane. This resonance effect ensures that only hydrogen in the target area absorbs energy, making the process extraordinarily selective.
After the RF pulse stops, protons release their absorbed energy and return to equilibrium. As they do, they emit weak RF signals at the same Larmor frequency. These signals are the raw data that eventually become your MRI image. The timing and strength of these emissions depend on the surrounding tissue, creating the contrast that radiologists use to distinguish healthy tissue from disease.
Inside the MRI Machine: Magnets, Coils, and Computers
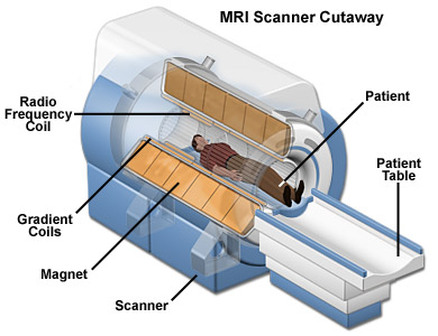
Superconducting Magnets Generate the Main Field
At the heart of every MRI scanner sits the main magnet, typically a superconducting coil cooled by liquid helium to near absolute zero (approximately -269°C). This extreme cooling allows electricity to flow without resistance, generating an intensely stable magnetic field that remains active 24 hours a day, even during power outages. Once energized, the current loops indefinitely, ensuring consistent proton alignment for every scan.
These magnets produce the static field (B₀) that polarizes hydrogen nuclei throughout your body. The uniformity of this field matters enormously; even tiny variations can distort the final image. That’s why superconducting magnets are engineered to maintain consistency within a few parts per million across the imaging volume.
Gradient Coils Create Spatial Encoding
Three sets of gradient coils (X, Y, and Z) sit inside the main magnet and produce temporary, controlled variations in magnetic field strength across space. These gradients enable the scanner to pinpoint exactly where each signal originates.
The slice selection gradient activates during the RF pulse to choose which body slice to image. The phase encoding gradient briefly applies along one direction to tag position by altering spin phase. The frequency encoding gradient activates during signal readout to distinguish location on the perpendicular axis via signal frequency. Together, these gradients encode three-dimensional spatial information into the emitted signals.
Rapid switching of gradient currents causes the loud knocking and buzzing sounds characteristic of MRI scans. These noises arise from magnetostriction, where the coil windings vibrate as magnetic fields rapidly change. Sound levels can reach 120 dB, equivalent to a rock concert, which is why patients receive earplugs or MRI-safe headphones.
RF System Transmit and Receives Signals
The RF system performs two critical functions. First, the RF transmitter delivers short pulses at the Larmor frequency to excite protons. Then, immediately after the pulse stops, the same system switches to receiving mode.
Specialized receiver coils placed directly against the body part being imaged (head, knee, spine) detect the faint electromagnetic signals emitted as protons relax. Modern scanners use multi-channel coil arrays and parallel imaging techniques like SENSE or GRAPPA to speed up acquisition without sacrificing detail. More coils means more signal coverage and faster imaging.
Shim Coils Correct Field Imperfections
Even the most precisely manufactured magnets contain slight imperfections. Shim coils are smaller electromagnetic coils that fine-tune the main magnetic field, correcting these inconsistencies to ensure uniformity across the imaging volume. Proper shimming is essential for accurate signal localization and minimizing image distortion, especially in high-resolution brain imaging and spectroscopy studies.
Computer Systems Reconstruct Images
A powerful central computer orchestrates the entire scan: it triggers RF pulses, activates gradients in sequence, collects raw data (stored in something called k-space), and applies complex reconstruction algorithms. Using Fourier transforms, the computer converts frequency- and phase-encoded data into two-dimensional or three-dimensional visual images. Advanced software also enables real-time imaging, motion correction, and AI-enhanced reconstruction for faster, clearer results.
The MRI Imaging Process: From Alignment to Image
Step 1: Patient Enters the Magnetic Field
Once you lie on the scanning table, the system moves you into the center of the magnet bore. Within seconds, the static field causes billions of hydrogen protons in your body to align. You feel nothing, but any ferromagnetic object near you (certain implants, tools, or even a forgotten oxygen tank) could become a dangerous projectile. This is why strict screening precedes every scan.
Step 2: RF Pulse Tips Magnetization
The scanner delivers a short RF pulse, typically a 90° or 180° flip angle. This adds energy to the protons, tipping the net magnetization vector away from the longitudinal (z) axis and into the transverse (xy) plane. At this moment, the protons spin in phase, creating a detectable rotating magnetic field.
Step 3: Protons Emit Signals During Relaxation
When the RF pulse ends, protons begin releasing absorbed energy and returning to equilibrium. As they do, they emit weak RF signals at the Larmor frequency. Receiver coils pick up these emissions. The timing and strength of signals depend on tissue type, which is critical for generating image contrast.
Step 4: Gradients Encode Spatial Location
While protons emit signals, gradient coils activate in sequence. First, the slice selection gradient applies during the RF pulse to excite only a specific slice. Then the phase encoding gradient briefly applies along one direction to encode positional phase differences. Finally, the frequency encoding gradient activates during signal readout to assign spatial frequency along another axis. Each unique combination of phase and frequency corresponds to a specific location in the body.
Step 5: Data Fills K-Space
The detected signals are stored in k-space, a raw data matrix where each point contains frequency and phase information from all protons in the slice. The center of k-space holds overall image contrast, while edges define fine details. A full scan requires multiple repetitions with varying phase encoding steps.
Step 6: Fourier Transform Creates the Final Image
Once k-space is filled, the computer applies an inverse Fourier transform to decode spatial information. This converts abstract frequency and phase data into a visual grayscale image where brightness reflects signal intensity. Different tissues appear distinct based on their relaxation properties, leading to T1, T2, and other contrast types.
T1 vs T2 Imaging: Creating Tissue Contrast
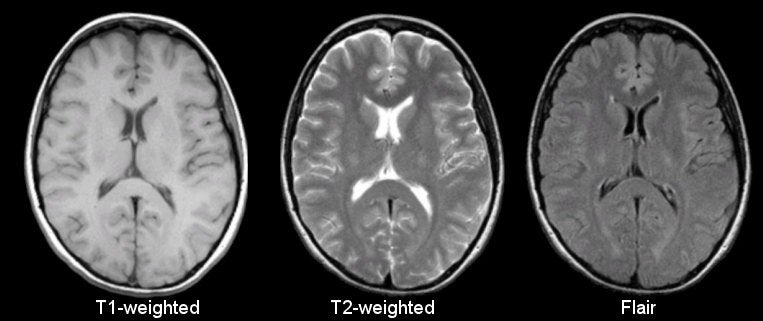
T1-Weighted Images Show Anatomy
T1 relaxation measures how quickly protons realign with the main magnetic field after excitation. Fat recovers quickly, appearing bright on T1-weighted images. Fluids like cerebrospinal fluid recover slowly and appear dark. These images excel at showing anatomy, especially brain structure, fatty tissue, and post-contrast enhancement.
T1-weighted settings typically use short TR (300-700 ms) and short TE (10-20 ms). Radiologists use these images to identify anatomical structures, evaluate fat-containing lesions, and detect enhancement after contrast administration.
T2-Weighted Images Reveal Pathology
T2 relaxation tracks how quickly protons lose synchronization in the transverse plane. Water-rich tissues maintain signal longer, so fluids like edema, cysts, and inflammation appear bright on T2-weighted images. This makes T2 ideal for detecting tumors, infections, and nerve injuries.
T2-weighted settings use long TR (>2000 ms) and long TE (80-120 ms). Pathological processes often contain increased water content, making them stand out against darker normal tissues.
Proton Density Imaging Evaluates Joints
Proton density-weighted imaging uses long TR and short TE to minimize both T1 and T2 effects. The result reflects the actual number of hydrogen atoms per volume. This sequence is especially useful in musculoskeletal MRI for identifying meniscal tears in the knee, where fluid and tissue need clear differentiation.
Common MRI Sequences and Their Clinical Uses

FLAIR Detects Neurological Disease
Fluid-attenuated inversion recovery (FLAIR) is a modified T2 sequence that nulls signal from free water like CSF. This makes abnormalities near ventricles, such as multiple sclerosis plaques or small strokes, stand out clearly. FLAIR is a cornerstone of neurological imaging.
STIR Identifies Bone Marrow Abnormalities
Short Tau Inversion Recovery (STIR) suppresses fat signal, making it sensitive to bone marrow edema, stress fractures, and soft tissue inflammation. Unlike fat-saturation techniques, STIR works reliably even with magnetic field inhomogeneities, making it valuable for spinal and extremity imaging.
DWI Catches Stroke Early
Diffusion-weighted imaging (DWI) measures how freely water molecules move. In acute stroke, cellular swelling restricts diffusion, causing bright signal within minutes, often before changes appear on CT or standard MRI. Combined with ADC maps, it confirms restricted diffusion and helps differentiate acute stroke from other conditions.
fMRI Maps Brain Function
Blood-oxygen-level dependent (BOLD) functional MRI detects tiny changes in blood oxygenation linked to neural activity. When a brain region activates, blood flow increases more than oxygen consumption, reducing deoxyhemoglobin and boosting the MRI signal. This reveals functional networks used in pre-surgical planning to avoid critical brain regions and in cognitive research.
MRA Visualizes Blood Vessels
Magnetic resonance angiography (MRA) captures blood flow without contrast using time-of-flight or phase-contrast methods. It identifies aneurysms, stenosis, and vascular malformations. With contrast (CE-MRA), it achieves even higher clarity for evaluating arterial and venous disease throughout the body.
Why MRI Uses Contrast Agents and How They Work
Gadolinium Enhances T1 Signal
Gadolinium-based contrast agents (GBCAs) are paramagnetic, meaning they shorten T1 relaxation in nearby tissues. On T1-weighted images, this creates bright enhancement in areas with increased blood flow or leaky vessels, common in tumors, inflammation, and infections.
Most GBCAs are chelated to reduce toxicity. Common examples include gadobutrol, gadoxetate, and gadoterate. Gadoxetate is partially excreted through the liver, making it ideal for liver lesion characterization.
Understanding Contrast Risks
Nephrogenic systemic fibrosis (NSF) is a rare but serious condition linked to certain linear GBCAs in patients with severe kidney disease. Dialysis patients require careful risk-benefit assessment before contrast use. Gadolinium retention can occur, with tiny deposits in the brain and bones. While no clinical effects are proven, regulatory agencies recommend using the lowest effective dose and preferring macrocyclic agents that are more chemically stable.
Specialized MRI Techniques Beyond Standard Imaging
Diffusion Tensor Imaging Maps Nerve Pathways
DTI extends DWI by measuring the directionality of water diffusion. In white matter tracts, water moves more easily along axons than across them. DTI calculates fractional anisotropy to generate 3D maps of brain connectivity used in stroke recovery, neurosurgical planning, and Alzheimer’s research.
MR Spectroscopy Measures Brain Chemistry
Magnetic resonance spectroscopy analyzes metabolite concentrations in tissues. Key markers include N-acetylaspartate (NAA) for neuronal health, choline for cell membrane turnover, creatine as a reference metabolite, and lactate indicating anaerobic metabolism. This helps differentiate tumor recurrence from radiation necrosis and assesses metabolic disorders.
Perfusion MRI Assesses Blood Flow
Dynamic susceptibility contrast (DSC) tracks a gadolinium bolus to measure cerebral blood volume and flow, critical for identifying stroke penumbra. Arterial spin labeling (ASL) magnetically labels arterial blood without contrast, enabling repeat cerebral blood flow studies in dementia, epilepsy, and other conditions.
Real-Time MRI Captures Motion
Advanced sequences like bSSFP or radial FLASH enable real-time MRI with frame rates down to 50 milliseconds. This allows imaging of beating hearts, swallowing mechanics, or joint movement without breath-holds. It’s particularly valuable in pediatric imaging and interventional procedures.
MR-Guided Focused Ultrasound Treats Tumors
Magnetic resonance-guided focused ultrasound (MRgFUS) combines MRI’s thermal imaging with high-intensity ultrasound waves to ablate tissue non-invasively. Approved for uterine fibroids, essential tremor, and bone metastases, it uses MRI to monitor temperature changes in real time, ensuring precise targeting while sparing surrounding healthy tissue.
What to Expect During Your MRI Scan
Scan Duration and Preparation
Most MRI exams take 30 to 50 minutes, depending on the body region and sequences required. A brain MRI might include T1, T2, FLAIR, DWI, and possibly contrast, with each sequence lasting 3 to 7 minutes. Newer AI-accelerated techniques can reduce scan time by up to 50% without sacrificing diagnostic quality.
You’ll lie on a padded table that slides into the magnet bore. Technologists provide instructions through an intercom, and you’ll have a call button in case of emergencies. Remove all metallic objects, including jewelry, watches, and clothing with metal fasteners.
Managing Noise and Claustrophobia
The gradient coils produce rhythmic thumping or buzzing reaching 120 dB. Patients receive earplums or MRI-safe headphones, and many centers offer music or guided meditation to ease anxiety. Despite the noise, the procedure is painless.
Up to 15% of patients experience claustrophobia. Solutions include open MRI machines with lower field strength and open sides, wide-bore scanners with 70 cm diameter, oral or IV sedation, or cognitive strategies like controlled breathing and visualization. Children or uncooperative adults may require general anesthesia.
MRI Safety: Who’s at Risk
Absolute Contraindications
Certain devices are absolutely contraindicated due to risk of movement, heating, or malfunction. Pacemakers and ICDs are dangerous unless specifically labeled MRI-conditional. Ferromagnetic aneurysm clips (especially older designs), certain cochlear implants, and metallic foreign bodies in the eyes (common in metalworkers) prevent scanning. All patients undergo thorough screening questionnaires before entering the scanner room.
Relative Contraindications Requiring Evaluation
Some conditions require caution and individual assessment. Most modern joint replacements, dental implants, and spinal rods are non-ferromagnetic and MRI-safe. Tattoos with metallic ink may heat up or cause skin irritation. Transdermal patches with foil backing must be removed to prevent burns. Pregnancy is generally safe for non-contrast MRI after the first trimester, though gadolinium is avoided unless absolutely necessary.
Diagnostic Applications: Where MRI Excels
Brain and Spine Imaging
MRI is unmatched for neurological disorders. It detects strokes within minutes via DWI, visualizes multiple sclerosis plaques, tumors, and epilepsy foci, maps functional brain activity with fMRI, and traces white matter tracts with DTI. Research-grade scanners achieve spatial resolution down to 100 micrometers.
Musculoskeletal Evaluation
MRI is the gold standard for ligaments, tendons, cartilage, and bone marrow. It diagnoses meniscal tears, rotator cuff injuries, and labral tears. It identifies occult fractures and bone bruises. Often, MRI eliminates the need for exploratory surgery.
Heart and Vessel Assessment
Cardiac MRI evaluates myocardial structure, function, and viability. It assesses cardiomyopathies, myocarditis, and congenital defects. MRA and MRV image arteries and veins for aneurysms, clots, and stenosis throughout the body.
Abdominal and Pelvic Scans
Liver MRI characterizes tumors using dynamic contrast and hepatobiliary agents. MRCP provides non-invasive views of bile and pancreatic ducts as an alternative to ERCP. Prostate MRI uses multiparametric imaging (T2, DWI, DCE) for cancer detection and staging. MR enterography assesses Crohn’s disease activity.
Advantages and Limitations of MRI Technology
Why MRI Remains Essential
MRI offers crucial benefits: no ionizing radiation makes it safe for repeated imaging, superior soft-tissue contrast reveals details invisible on other scans, multiplanar imaging captures axial, sagittal, and coronal views without repositioning, and functional data goes beyond pure anatomy to reveal metabolic and physiological information.
Challenges to Consider
Long scan times increase motion artifact risk and patient discomfort. High costs exceed CT or ultrasound. The loud noise and confined space may require sedation. The strong magnetic field demands strict safety protocols and prevents many patients with certain implants from scanning.
Emerging Innovations Shaping MRI’s Future
Portable and Low-Field MRI
FDA-approved 0.064 T portable scanners now enable bedside brain imaging in ICUs, crucial for stroke detection in critically ill patients. While lower in resolution than traditional scanners, they offer accessibility in remote locations and emergency settings where traditional MRI is unavailable.
AI Accelerates Scanning
The fastMRI initiative (Meta AI and NYU) uses deep learning to reconstruct diagnostic-quality images from undersampled k-space data. Models like E2E-VarNet reduce scan time dramatically while preserving detail, promising faster, quieter, and more efficient exams.
Quantitative MRI for Precision Medicine
Quantitative MRI measures absolute tissue values (T1, T2, fat fraction) rather than relative contrast. This enables objective tracking of diseases like liver steatosis and multiple sclerosis, improving consistency across different scanners and over time.
Magnetic Resonance Elastography Tests Tissue Stiffness
MRE combines MRI with mechanical vibrations to map tissue stiffness non-invasively. It’s becoming a alternative to liver biopsy for diagnosing fibrosis and cirrhosis, with promising applications in brain and breast imaging as well.
Key Takeaways on How MRI Scanners Work
MRI harnesses the magnetic properties of hydrogen protons in your body to create detailed internal images without radiation. The process involves aligning protons in a powerful magnetic field, exciting them with radiofrequency pulses, detecting their emitted signals, and reconstructing those signals into visual images using Fourier transforms. Different tissue types produce distinct signal characteristics, creating natural contrast that T1, T2, and specialized sequences exploit for anatomical and pathological evaluation. Advanced techniques like functional MRI, diffusion imaging, and MR spectroscopy push the technology beyond anatomy into physiology and metabolism. While MRI requires expensive equipment and patient cooperation, its safety, versatility, and diagnostic power make it indispensable in modern medicine.
Whether you’re a patient preparing for a scan or a curious learner, understanding how an MRI scanner works demystifies one of modern medicine’s most remarkable technologies.
Frequently Asked Questions About MRI Scanners
How does an MRI machine create images without radiation?
MRI uses powerful magnets and radio waves to manipulate hydrogen protons in your body’s water and fat molecules. Unlike X-rays or CT scans, there is no ionizing radiation. The scanner detects signals emitted by protons as they relax after being excited, then reconstructs these signals into detailed cross-sectional images.
Why is MRI so loud?
The loud knocking and buzzing sounds come from gradient coils rapidly switching on and off. These coils create temporary magnetic field variations for spatial encoding. The vibrations produced by magnetostriction can reach 120 decibels, which is why patients receive hearing protection.
How long does a typical MRI scan take?
Most MRI exams last 30 to 50 minutes, depending on the body part and number of sequences. A brain MRI might include five or more sequences, each taking 3 to 7 minutes. Newer AI-accelerated techniques can significantly reduce this time.
Can anyone have an MRI scan?
Not everyone. Patients with pacemakers, certain cochlear implants, ferromagnetic aneurysm clips, or metallic eye foreign bodies cannot undergo MRI. Other conditions like joint implants, tattoos, and pregnancy require individual evaluation. Thorough screening before scanning is mandatory.
What is the difference between T1 and T2 MRI images?
T1-weighted images show anatomical detail with fat appearing bright and fluid dark. T2-weighted images highlight pathology with fluid appearing bright, making edema, inflammation, and cysts stand out. Radiologists use both to differentiate normal structures from disease.