You have an all-in-one printer but might be missing out on its full capabilities. If you’re still paying for copy shop scanning or taking blurry photos of documents, you’re wasting money and time. Most modern printers can scan directly from the device, giving you clean, professional digital copies of receipts, contracts, photos, and more.
This guide walks you through every step to use your printer as a scanner. You’ll learn how to confirm your printer supports scanning, set up the right connection, install necessary software, and choose the best scanning method for your needs whether you’re using Windows, Mac, a phone, or the printer’s own control panel.
Confirm Your Printer Has Scanning Capability
Before attempting to scan, verify your printer actually has this functionality. Not every printer can scan, and using a single-function device will only lead to frustration.
Look for these indicators that your printer supports scanning:
• A flatbed glass surface under the lid where you place documents
• An automatic document feeder (ADF) tray for multi-page scanning
• A dedicated “Scan” button on the control panel
• Model name containing terms like “All-in-One,” “Multifunction,” or “OfficeJet”
Check your user manual or search your model number on the manufacturer’s website (HP, Canon, Epson, Brother) to confirm scanning support. Single-function printers that only print cannot be used as scanners under any circumstances.
Connect Your Printer for Scanning

Your printer must be properly connected before scanning. The connection type you choose affects how you initiate scans and which devices can access the scanner.
Choose the connection method that fits your situation:
• USB: Best for direct, reliable connection to a single computer
• Wi-Fi: Enables wireless scanning from laptops, phones, and tablets when on the same network
• Ethernet: Ideal for office environments needing shared access
• Bluetooth: Rare but available on select mobile-friendly models
• USB Flash Drive: Allows scanning directly to a USB drive without any computer
Always power on the printer before starting a scan session. For wireless scanning, ensure both your printer and the device you’re scanning to are connected to the same network.
Install Required Scanning Software
Proper software installation is critical. Without the full software suite, your computer may recognize the printer but fail to activate the scanner.
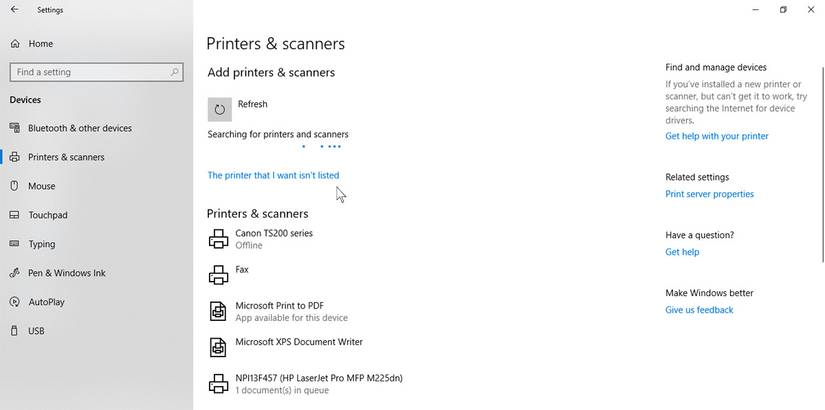
On Windows
- Open Settings, then navigate to Bluetooth & devices, then Printers & scanners
- Click Add device and wait for your printer to appear
- Select your printer when detected
- Download and install the full feature software from the manufacturer’s website
This matters because basic print-only drivers lack scanning components. If your scanner isn’t detected after installation, restart the Windows Image Acquisition (WIA) service by pressing Win + R, typing services.msc, finding Windows Image Acquisition (WIA), setting it to Automatic, and clicking Start.
On macOS
- Open System Settings and go to Printers & Scanners
- Select your printer from the list
- Click the Scan tab, then select Open Scanner
- Adjust your settings and click Scan
Alternatively, use the Image Capture app in your Applications folder, which auto-detects connected scanners.
On Chromebook
- Ensure your printer and Chromebook are on the same Wi-Fi network
- Open Settings, then Advanced, then Printing and scanning
- Click Scan, select your device, and begin scanning
Some Chromebooks require manufacturer apps from the Google Play Store for full functionality.
Prepare Your Document for Scanning
Proper document placement prevents skewed or incomplete scans. The method depends on whether you’re scanning a single page or multiple pages.
Using the Flatbed for Single Pages
Lift the scanner lid and place your document face-down on the glass. Align the top-left corner with the marked guide or notch. Close the lid gently to prevent movement during scanning.
Using the Automatic Document Feeder
Open the document feeder tray and insert pages face-up, top edge first. Adjust the paper guides to prevent jams and skewing. Never exceed the maximum sheet capacity listed in your manual, and avoid using wrinkled, torn, or coated paper.
Some ADFs support automatic duplex (double-sided) scanning, while others require you to flip pages manually after scanning the first side.
Scan from Windows
Windows includes a built-in scanning app that works with most printers.
- Press the Windows key, type Scan, and open the Scan app. If it’s missing, install “Windows Scan” from the Microsoft Store
- Select your scanner from the dropdown menu
- Choose Auto to let Windows detect document position, or select Manual to specify flatbed or ADF
- Set your file type (PDF, JPEG, PNG, or TIFF), color mode (Color, Grayscale, or Black & White), and resolution
- Click Scan and choose where to save the file
Default save location is typically Documents > Scanned Documents.
As an alternative, search for “Windows Fax and Scan,” click New Scan, select your scanner, set your preferences, preview the alignment, and complete the scan.
Scan from Mac
Mac users have two solid options for scanning.
- Go to System Settings > Printers & Scanners and select your printer
- Click the Scan tab, then Open Scanner
- Click Show Details to access all settings
- Choose color mode, file format (PDF, JPEG, PNG, or TIFF), resolution (150 to 600 DPI), and destination folder
- Click Scan
You can also use the Image Capture app in your Applications folder, which automatically detects connected scanners and lets you configure settings before scanning.
Scan from Phone or Tablet

Mobile scanning apps put full scanning capability in your pocket. Most manufacturers offer dedicated apps.
Using HP Smart App as an Example
- Install HP Smart from the App Store or Google Play
- Ensure your printer and phone are on the same Wi-Fi network
- Open the app and select your printer
- Tap Scan, then choose your source (Glass Scanner) and preset (Documents)
- Set resolution up to 300 DPI on mobile
- Tap Preview to check quality, then tap Scan
To create a multi-page PDF, tap Scan again after each page, add pages one by one, then save as PDF. Share directly via email, cloud storage, or messaging apps.
Other brands offer similar apps: Canon PRINT, Epson ScanSmart, and Brother iPrint&Scan.
Scan Without a Computer
Many printers can scan directly without any computer involved. This is perfect for offline work or quick digitization.
Save Scans to USB Drive
- Insert a USB flash drive into the printer’s USB port
- Select Scan to USB on the control panel
- Place your document face-down on the glass
- Enter a filename and choose file type (PDF or JPEG)
- Start the scan and remove the USB drive
The USB must be formatted as FAT32, and 32GB or smaller drives work best.
Send Scans via Email
- Select Scan to Email on the printer panel
- Enter the recipient’s address or select from contacts
- Log in to your email account when prompted
- Set file type, resolution, and color mode
- Place the document and press Send
Avoid storing email passwords on shared office printers for security reasons.
Upload to Cloud Storage
- Set up your cloud account (Google Drive, Dropbox, OneDrive, or Box) in printer settings
- Select Scan to Cloud on the control panel
- Choose your service and destination folder
- Adjust settings and start the scan
The file uploads automatically. You may need to re-authenticate if your login expires.
Network Folder Scanning
- Access the printer’s web interface using its IP address
- Go to Scan Settings > Scan to Folder
- Enter the network path (like \PC-NAME\Scans)
- Provide username and password for access
- Save settings and test the connection
Scanned files appear directly in the shared folder without manual transfer.
Choose the Right File Format
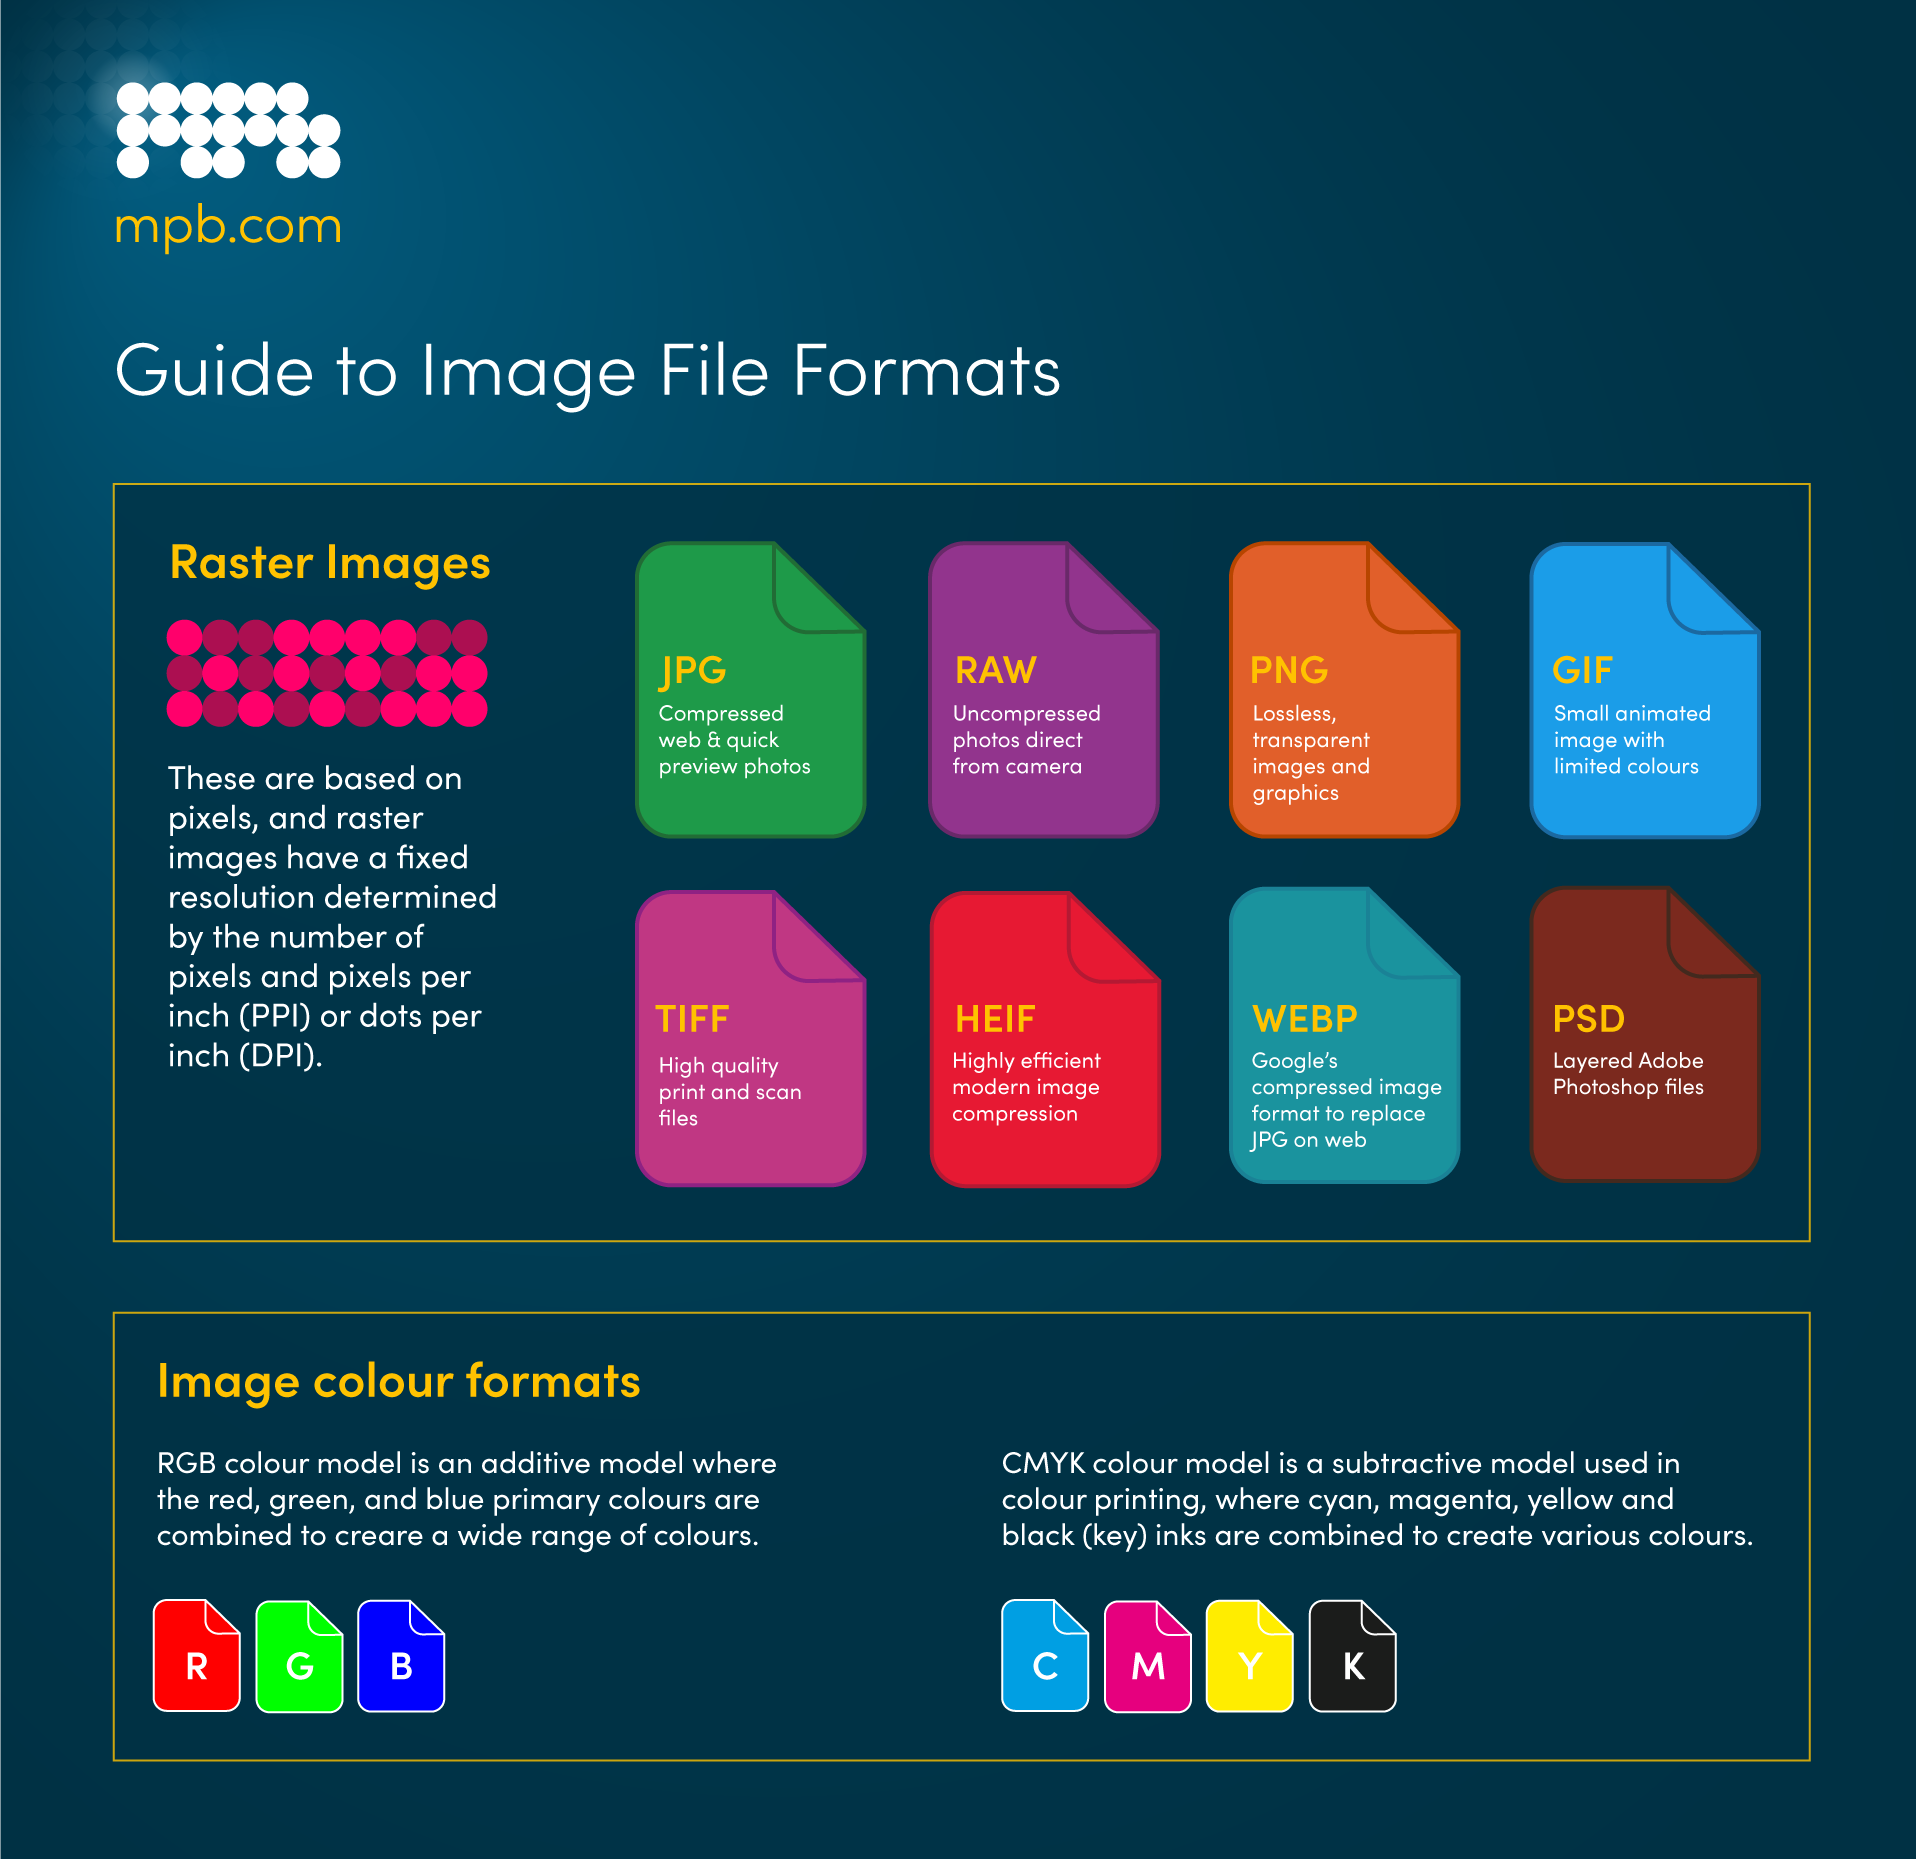
Your choice of format affects file size, quality, and compatibility.
• PDF: Best for documents, contracts, and forms. Preserves layout and becomes searchable with OCR
• JPEG: Ideal for photos. Compressed format with smaller file sizes
• PNG: Best for logos and diagrams. Lossless compression supports transparency
• TIFF: Perfect for archival and high-quality reproduction. Large files preserve maximum detail
PDF is recommended for most document scanning due to wide compatibility and searchability.
Set Correct Scan Resolution
Resolution (measured in DPI) determines detail level and file size.
• 150 DPI: Quick drafts and internal notes
• 300 DPI: Standard for documents, receipts, and letters
• 600 DPI: High detail for photos, signatures, and archival work
• 1200+ DPI: Specialized use for artwork or film negatives
Higher DPI produces larger files. Balance quality against storage needs.
Use the Printer Control Panel to Scan
Many printers let you initiate scans directly from the touchscreen or buttons.
- Press Scan on the printer
- Choose your destination (Computer, Email, Cloud, or USB)
- Set color mode, file format, and resolution
- Press Start
The full software must be installed on the target computer for “Scan to Computer” to work. Default save locations vary by brand: HP uses Documents\Scans, Canon uses My Documents\Canon Scans, and Epson uses Pictures\Scanned Images.
Model-Specific Tips
HP Printers
Use the HP Smart App for the best experience. For push scanning, press Scan then Scan to Computer. Reinstall full software if scanning fails.
Canon Printers
Use IJ Scan Utility for batch scanning with custom profiles and PDF merging. Works with Image Capture on Mac.
Epson and Brother
Download Epson ScanSmart or Brother iPrint&Scan from the manufacturer support site. Both include OCR, PDF tools, and editing features.
Scan Large Documents
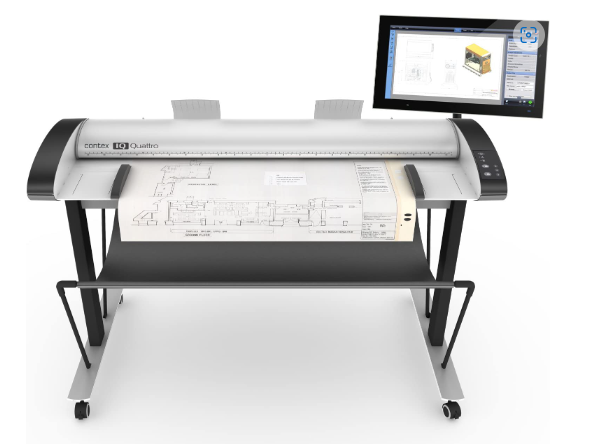
Standard printers cannot scan large format documents. For blueprints, engineering drawings, maps, and posters, you need specialized equipment.
Options include the SmartLF Portable Scanner (A0 size, saves to USB or cloud) and the Contex SD3600 (36-inch width, up to 2400 DPI). These models support face-up scanning and onboard storage.
Fix Common Scanning Problems
Scanner Not Detected
Reinstall the full software suite and check your USB or Wi-Fi connection. Restart both the printer and computer.
No Devices Found in Scan App
Restart the Windows Image Acquisition (WIA) service. Temporarily disable your firewall to test if it’s blocking the connection.
Poor Scan Quality
Clean the scanner glass with a microfiber cloth. Increase resolution to 300 DPI or higher. Avoid pressing down on documents during scanning.
Push Scan Fails to Reach Computer
Keep the manufacturer app running on your computer. Disable sleep mode during scanning sessions.
ADF Jams or Double-Feeds
Clean the rollers with a dry cloth. Use dry, flat paper and avoid coated or wrinkled sheets.
Maintain Your Scanner
Regular maintenance prevents scanning problems and extends equipment life.
Clean the scanner glass weekly using glass cleaner and a microfiber cloth. Dirty glass causes streaks and shadows that ruin scans. Update firmware and software regularly for best performance. Organize scanned files with clear folder names and use OCR tools like Adobe Acrobat or ABBYY to make text searchable.
Best Scanning Method by Use Case
Choose your method based on your specific situation:
• Home Users: Mobile app (HP Smart) or USB connection to computer
• Small Offices: Scan to network folder or cloud storage
• High-Volume Work: Printer with ADF and automatic duplex scanning
• Secure Environments: Avoid saved credentials; use authenticated scanning instead
• Archival Projects: Scan at 600 DPI using PDF/A format with OCR enabled
Frequently Asked Questions About Using a Printer as a Scanner
Can any printer be used as a scanner?
No. Only all-in-one (AIO) or multifunction printers (MFPs) have scanning capability. Single-function printers that only print cannot be used as scanners.
Why is my scanner not detected on Windows?
This usually happens when only basic print drivers are installed rather than the full software suite. Reinstall the complete software from the manufacturer’s website and restart the Windows Image Acquisition (WIA) service.
What resolution should I use for document scanning?
300 DPI is the standard for most documents, receipts, and letters. Use 150 DPI only for quick drafts. Increase to 600 DPI for photos, signatures, or archival work.
Can I scan multiple pages into one file?
Yes. Most scanning software and mobile apps support multi-page PDF creation. On mobile apps like HP Smart, tap Scan again after each page to add to the same file, then save as PDF.
How do I scan without a computer?
Use your printer’s built-in features: scan to USB drive, scan to email, or scan to cloud storage (Google Drive, Dropbox, OneDrive). These work directly from the printer’s control panel without any computer connected.
Key Takeaways for Using Your Printer as a Scanner
Your all-in-one printer is already equipped to handle scanning tasks efficiently. The process comes down to confirming your printer has scanning capability, installing the full software from the manufacturer, and choosing the right connection method for your workflow. Whether you prefer scanning from your computer, phone, or directly from the printer’s control panel, modern AIO printers offer flexible options for every situation.
Remember to choose PDF for documents (enabling searchability through OCR), use 300 DPI for standard scanning, and keep the scanner glass clean for consistent quality. For multi-page documents, take advantage of ADF capabilities or mobile app multi-page features. With your printer now functioning as a capable scanner, you can digitize receipts, archive important documents, and create searchable files without any additional hardware.