You’re driving when suddenly the Check Engine Light illuminates on your dashboard. While this glowing orange indicator can signal serious problems, it often triggers for minor issues like a loose gas cap or temporary sensor glitch. The good news: if your vehicle was manufactured after 1996, you can clear the check engine light with a scanner in minutes, often without paying a mechanic.
Using an OBD2 scanner, you can read diagnostic trouble codes, identify the cause, and safely reset the warning light. This guide walks you through every step from locating the port to verifying the fix. Whether you’re preparing for a smog test, checking a used car, or just silencing a nagging dashboard light, this process puts control back in your hands. Just remember: clearing the code is not a repair, and if the underlying issue remains, the light will return.
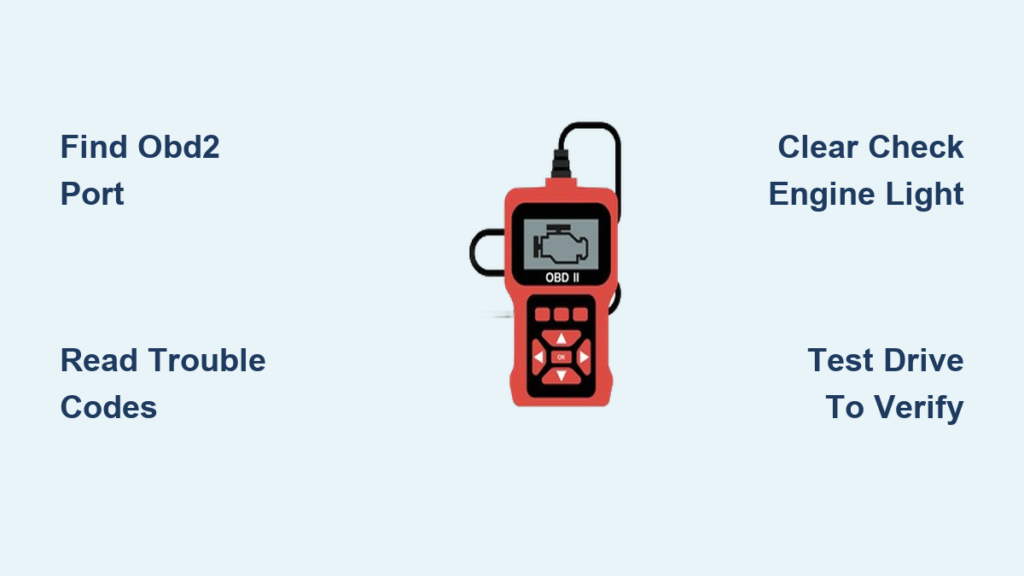
Find Your OBD2 Port
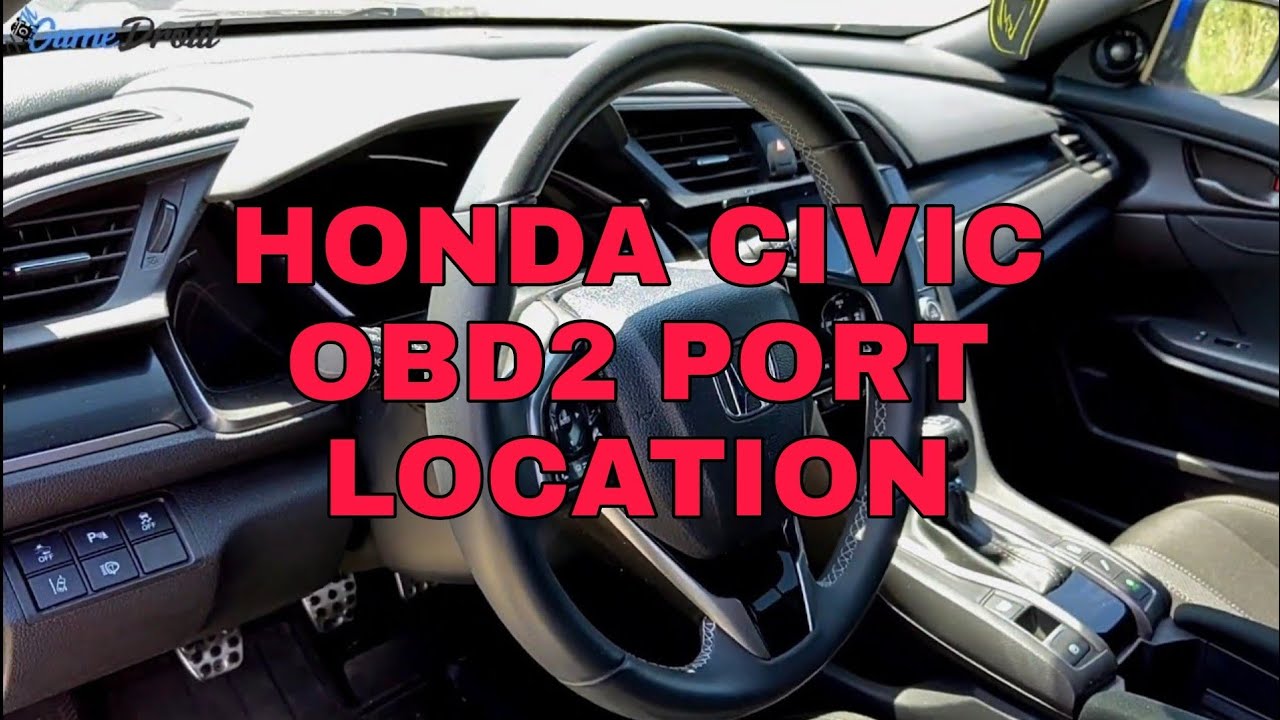
Standard Port Location
The OBD2 port is typically located under the driver’s side dashboard, within easy reach of the steering column. Look near the brake pedal or along the lower edge of the dash. Most vehicles built after 1996 follow this standard placement, making it relatively easy to find.
Alternative Port Positions
Some models place the port in less obvious spots. You may find it in the center console near the armrest, in the passenger side footwell, or behind a storage compartment or trim panel. If you cannot locate it, consult your owner’s manual or search online using your vehicle’s make, model, and year. Never force a connection. Ensure the port is clean and undamaged before inserting the scanner.
Power On and Connect
Turn Ignition to ON Position
Before plugging in your scanner, turn the key to the ON position, which is one step before starting the engine. This powers the vehicle’s computer system without running the engine. For push-button start vehicles, press the button twice without pressing the brake to activate accessories.
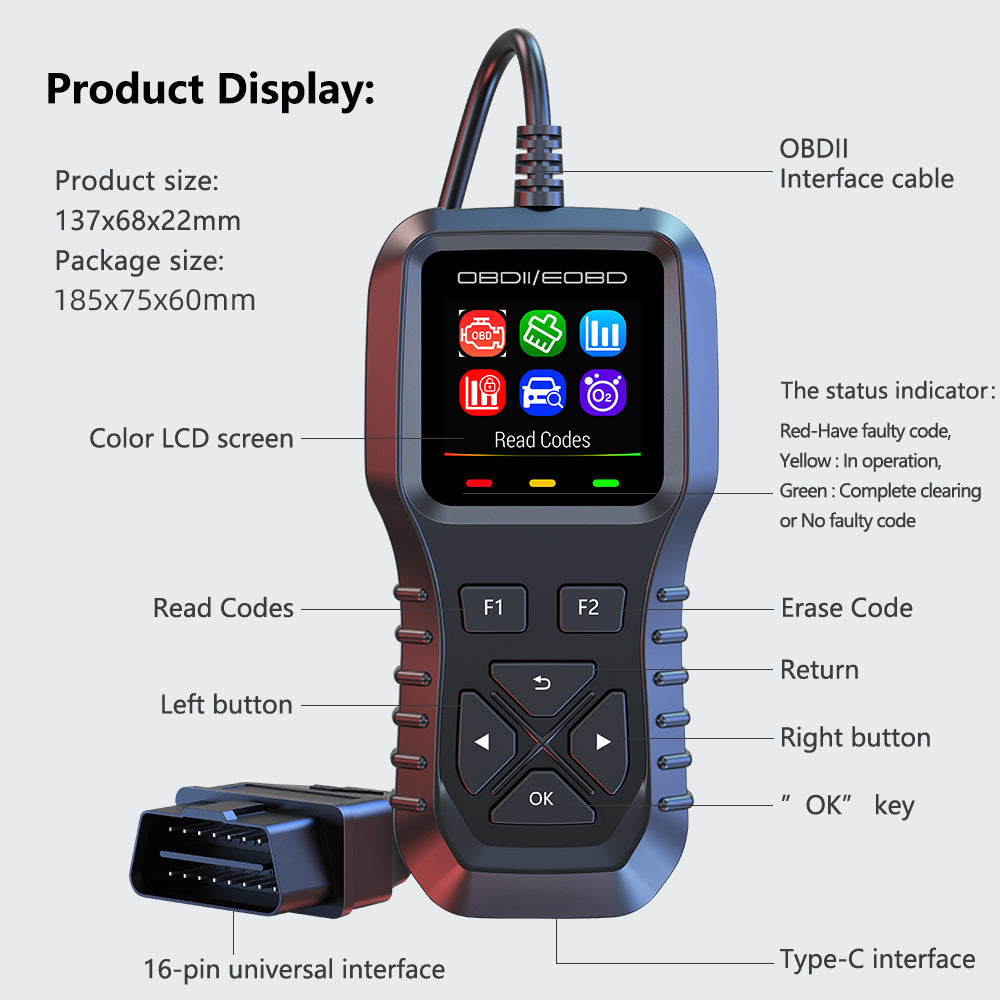
Plug in the Scanner
Insert the OBD2 scanner firmly into the port. Most tools power up automatically upon connection. Wait 10 to 20 seconds for the device to initialize and display a message like “Linking” or “Connected.” If no signal appears, check the fuse, which is usually labeled “DOME” or “ECU,” and ensure the ignition is turned to the ON position.
Read Stored and Pending Codes
Retrieve Active Trouble Codes
Navigate your scanner’s menu to read stored codes. The tool will display any diagnostic trouble codes stored in the engine control module. Common examples include P0455 for large evaporative emission leak, P0171 for system too lean, and P0300 for random or multiple cylinder misfire. Write down each code for reference, as these are clues rather than final diagnoses.
Check for Pending Codes
Select read pending codes next. These indicate intermittent faults detected during a single drive cycle but not severe enough to trigger the malfunction indicator light permanently. A pending code today could become an active code tomorrow. Never clear codes without recording them first, as you might erase critical data needed to diagnose recurring issues.
Understand Code Meaning
Decode DTC Structure
Every code starts with a letter and number indicating the affected system. P stands for powertrain, which covers the engine and transmission. B indicates body systems, C represents chassis, and U denotes network or communication issues. For example, P0135 means a generic powertrain fault related to the oxygen sensor heater circuit. The zero indicates it is a standardized code rather than manufacturer-specific.
Identify Common Triggers
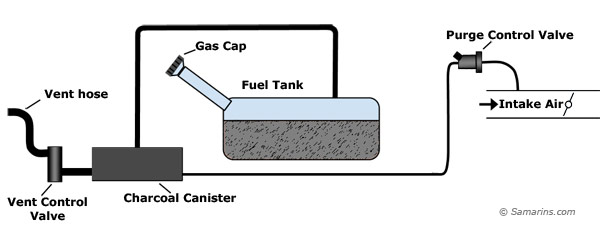
Some frequent culprits behind recurring codes include a loose or faulty gas cap triggering P0455 or P0456, a failing oxygen sensor causing P0135 or P0141, a dirty mass airflow sensor leading to P0102, and ignition coil failure producing P0300 series misfire codes. Replacing parts based solely on codes leads to wasted money. Test components before swapping them.
Clear Check Engine Light
Select Erase Codes Option
Once you have recorded all codes, go back to the main menu and select erase codes, clear DTCs, or reset MIL. Confirm the action when prompted. The scanner sends a reset command to the engine control module. Wait 5 to 10 seconds. Most devices show a confirmation like “Codes Cleared” or “MIL Off.”
Confirm Light Is Off
With the engine still off, observe the dashboard. The Check Engine Light should disappear immediately after erasure. If it remains lit, the scanner may not support your vehicle, or the engine control module requires a rekey cycle. Restart the engine and verify the light stays off during idle and acceleration.
Verify Fix with Test Drive
Drive Under Varied Conditions
Take a 5 to 10 mile test drive that includes idling at a stoplight, accelerating from 0 to 55 mph, cruising on the highway, and gentle deceleration without hard braking. This allows the vehicle’s onboard systems to run self-diagnostics and detect if the original fault returns.
Rescan After Driving
After your drive, reconnect the scanner and check for new codes. If none appear, the issue was likely temporary, such as a loose gas cap. If the same code reappears, the problem persists and requires actual repair. Perform this verification within 24 hours to catch intermittent faults early.
Check Emission Readiness for Smog Test

Access I/M Readiness Menu
If you are preparing for an emissions inspection, use your scanner to access readiness or I/M readiness. This screen shows whether the vehicle’s emission monitors have completed their self-tests. Each system displays a green check for complete, a red X for not ready, or a circle slash for not applicable.
Complete Drive Cycle if Needed
After clearing codes, monitors reset and require a drive cycle to complete. This involves a cold start with the engine below operating temperature, idling for 2 to 3 minutes, accelerating smoothly to 55 mph and maintaining speed for 3 minutes or more, then decelerating without braking. Repeat under city and highway conditions. Completion typically takes 50 to 100 miles of real-world driving. Presenting a vehicle with multiple red X marks at a smog check will result in failure, even if no codes are present.
Avoid Common Mistakes
Do Not Clear a Flashing Check Engine Light
A flashing CEL signals a severe engine misfire that can overheat and destroy the catalytic converter. Do not clear the code. Stop driving and get the vehicle towed to a mechanic immediately.
Never Ignore Drivability Issues
If you experience rough idle, stalling, poor acceleration, or unusual noises, clearing the light masks a real problem. Diagnose the issue first before attempting to reset the warning light.
Do Not Rely on Cheap Scanners Alone
Low-cost code readers may fail to communicate with some ECUs, lack erase functionality, or miss pending or manufacturer-specific codes. Invest in a reliable tool. Basic models start at around $20 and can handle most consumer needs.
Use Scanner for Smart Car Buying
Scan Before You Buy
Always test a used car with an OBD2 scanner before purchase. Connect and check for stored and pending codes, emission readiness status, and VIN and calibration IDs. This takes less than a minute and can reveal hidden problems.
Spot Red Flags
Be cautious if no codes are stored but all monitors show red X marks, as this suggests recent battery disconnect or intentional code clearing. Multiple pending codes indicate intermittent faults that may surface after purchase. A VIN that does not match the vehicle may indicate odometer rollback or title issues. The ideal result is no codes and all green checks, which indicates a healthy, transparent vehicle history.
Choose the Right OBD2 Scanner
Match Tool to Your Needs
For general owners, a basic handheld with screen and erase function works well. DIY enthusiasts benefit from an advanced tool with live data, freeze frame, and bi-directional control. Used car shoppers can use a Bluetooth OBD2 dongle with Torque Pro app on a smartphone.
Key Features to Look For
Look for essential features including erase function for resetting the MIL, readiness monitor display for smog checks, pending code detection for catching intermittent issues, VIN and calibration readout for verifying vehicle identity, and a compact durable design with protective cap for the port. Avoid tools that only read codes but cannot erase them.
When Clearing Works and When It Does Not
Successful Use Cases
Clearing the light is safe and effective when a gas cap was loose, as tightening and clearing after 1 to 2 drive cycles resolves it. It also works when the battery was recently disconnected, as the system needs to relearn, and when a temporary sensor glitch occurs and the code does not return after driving.
When Repair Is Required
If the light returns with the same code, expect one of these common issues: a vacuum leak causing lean fuel condition, a failed oxygen sensor, a clogged fuel injector, or worn spark plugs or coils. Use live data on advanced scanners to monitor fuel trims, O2 sensor voltage, and coolant temperature for real-time clues to hidden problems.
Post-Clearance Monitoring Tips
Re-Scan Weekly
Even after successful clearance, rescan every few days for a week. Pending codes may surface later, indicating problems that were not severe enough to trigger the light initially.
Track Fuel Trim Data
On capable scanners, view short-term fuel trim and long-term fuel trim values. Values outside plus or minus 10 percent suggest air or fuel imbalance, which is an early warning of sensor or leak issues.
Set Maintenance Alerts
Use your scanner to monitor mileage, track oil life if supported, and log freeze frame data from future events. Staying ahead of small issues prevents them from triggering the CEL again.
Frequently Asked Questions About Clearing Check Engine Light with Scanner
Can I clear the check engine light without fixing the problem?
Yes, you can clear it with a scanner, but the light will typically return if the underlying issue persists. The scanner resets the warning light, not the problem that triggered it. If the fault is still present, the vehicle’s computer will detect it again, often within a few drive cycles.
Will clearing the check engine light reset my odometer or other vehicle settings?
No, clearing codes does not reset mileage or most vehicle settings. The odometer reading is stored in a separate module. However, some vehicle-specific settings like tire pressure monitoring or radio presets may need to be reinitialized after a battery disconnect.
How long do I have to drive before the emissions monitors are ready after clearing codes?
Emission monitors typically require 50 to 100 miles of mixed driving to complete their self-tests. This includes cold starts, idle time, acceleration, highway cruising, and deceleration. The exact time varies by vehicle make and model.
What does it mean if the check engine light comes back immediately after clearing?
If the light returns immediately or within minutes, the underlying problem is still present and likely requires repair. Common causes include a persistent vacuum leak, failing oxygen sensor, faulty mass airflow sensor, or ignition system issues.
Can a basic OBD2 scanner clear all check engine lights?
Most basic scanners can clear generic OBD2 codes on vehicles made after 1996. However, some manufacturer-specific or permanent codes may require an advanced scanner. Additionally, some vehicles have security features that prevent code clearing without proper tool authentication.
Is it illegal to clear the check engine light before a smog test?
In most states, it is not illegal to clear codes yourself, but the vehicle must pass the emissions test. If monitors are not ready or codes return during testing, the vehicle will fail. Some states have specific rules about recent code clearing, so check local regulations.
Key Takeaways for Clearing Check Engine Light with Scanner
Clearing the check engine light with a scanner is a straightforward process that takes under 10 minutes with the right tool. Always read and record codes before erasing them, as this information is critical for proper diagnosis. After clearing, perform a test drive and rescan to verify the issue was truly temporary rather than an ongoing problem.
The real value of an OBD2 scanner extends beyond just turning off a dashboard light. It empowers you to understand your vehicle’s health, verify repairs before paying a mechanic, and make informed decisions when purchasing used cars. A basic scanner costing $20 to $50 can save you hundreds of dollars in unnecessary diagnostic fees.
Remember that the scanner tells you what systems are affected, but you must determine why and what to do next. Use this knowledge wisely, and treat the Check Engine Light as a helpful warning rather than an annoyance to simply silence.