Your ScanSnap scanner suddenly stops responding after a Windows update. You press the scan button, but nothing happens. The software won’t open, and Device Manager shows a yellow exclamation mark next to your scanner. You’re not alone. Thousands of users with iX500, iX1500, S1500, and other Fujitsu models face this exact problem, especially after Windows 11 22H2 or 24H2 updates. The root causes typically involve driver conflicts, USB failures, or misconfigured Windows services like Windows Image Acquisition (WIA). The good news: most problems are fixable without replacing your hardware. This guide delivers proven, step-by-step solutions so you can get your ScanSnap working again in minutes.
Diagnose Why Your ScanSnap Scanner Is Not Working
Before attempting fixes, confirm the exact symptom your scanner exhibits. This saves time and directs you to the right solution faster.
Common symptoms indicating your ScanSnap scanner is not working include:
- “Failed to connect to scanner” or “device is not responding” error messages
- Scanner not recognized in Device Manager or System Report
- ScanSnap software fails to launch or crashes immediately
- Red exclamation icon next to your scanner model in ScanSnap Home
- Physical scan button blinks but paper does not feed
- Blue checkmark missing in the Select a scanner dropdown
Visual diagnostic cues to check:
- Open and close the ADF cover; it should respond with a mechanical click if powered
- Look for a blue LED on the front panel indicating ready status
- In ScanSnap Home, a blue checkmark next to your scanner name means good connection, while a red exclamation mark indicates communication failure
Identifying your exact symptom helps you skip unnecessary steps and apply the fix that actually resolves your specific issue.
Fix WIA Service Settings to Restore Scanner Communication
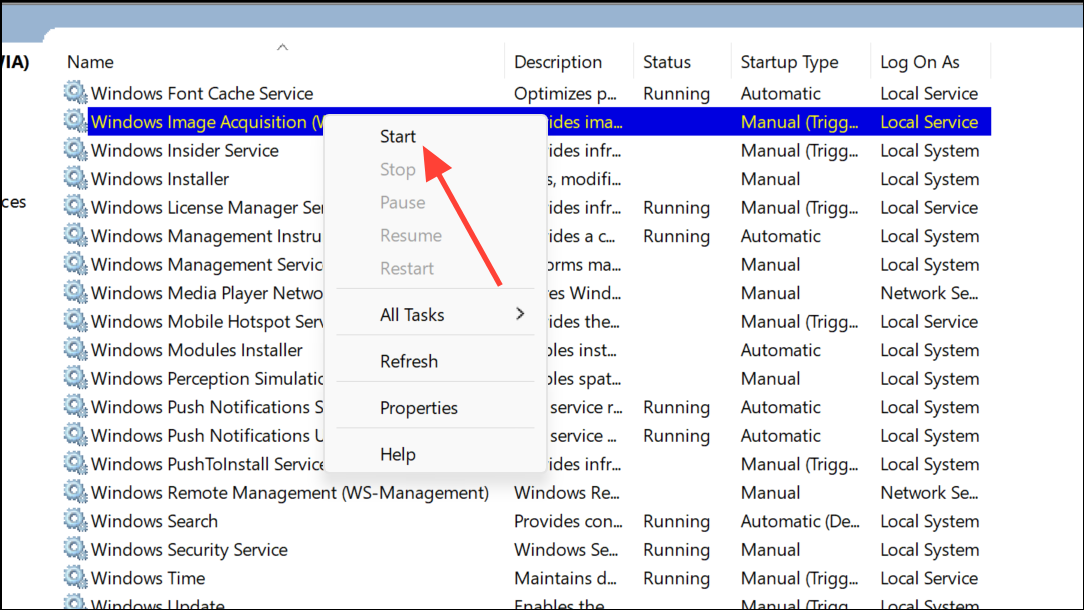
The Windows Image Acquisition (WIA) service is often reset after operating system updates, blocking communication between your computer and the ScanSnap scanner. If your scanner is detected but remains unresponsive, this is typically the first fix to try.
Steps to restore WIA service settings:
- Press Win + R, type services.msc, and press Enter
- Scroll down and locate Windows Image Acquisition (WIA)
- Right-click the service and select Properties
- Click the Log On tab
- Select Local System account
- Check the box labeled Allow service to interact with desktop
- Click OK, then restart your computer completely
This fix works because Windows updates frequently reset WIA permissions, removing the access needed for imaging devices to communicate with your system. Restoring Local System account access re-enables this critical link without requiring driver reinstallation.
Pro Tip: Document your WIA service settings before future Windows updates so you can quickly restore them if needed.
Resolve Profile Conflicts Causing Scan Failures
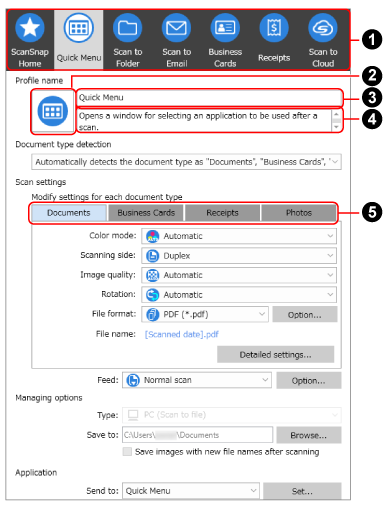
If you see the error “You cannot edit profiles created by other users,” scanning fails even when your ScanSnap scanner is properly connected. This happens when importing profiles from another computer or user account, or when profiles reference deleted folders or inaccessible network paths.
Steps to create a local profile and fix this issue:
- Open ScanSnap Home and click Scan to open the scan window
- Next to Select a scanner, click Edit profiles
- If the error message appears, do not attempt to use that profile
- Click New to create a fresh profile
- Name your profile (for example, “My Office Scan”)
- Set your scan destination (PDF, email, or cloud storage)
- Save the profile and select it for your next scan
What to verify:
– A blue checkmark next to your scanner name confirms good connection
– A red exclamation mark indicates a communication failure requiring other fixes
– Never import profiles from other machines; recreate them locally instead
Check USB and Hardware Connections
A loose cable or faulty USB port can mimic software failure. Rule out physical connection issues before diving into driver configurations.
Power cycle your ScanSnap scanner:
- Turn off the scanner completely
- Unplug both power and USB cables from the device
- Wait exactly 10 seconds
- Reconnect all cables firmly
- Power on the scanner and wait for startup to complete
Test USB connections directly:
- Use only the original USB cable that came with your scanner
- Plug directly into your computer, avoiding hubs, docking stations, or USB extensions
- Try USB 2.0 ports rather than USB 3.0+ ports, as some motherboards fail to recognize ScanSnap scanners on faster ports
- Swap cables if you suspect damage
Warning: Many users report that ScanSnap scanners fail to initialize when connected via USB 3.0+ ports. Using USB 2.0 mode resolves this compatibility issue on most motherboards.
Reinstall ScanSnap Drivers Cleanly to Fix Conflicts

Old driver files left behind after uninstallation cause conflicts with fresh installations. A clean reinstall requires manually removing residual files before installing new software.
Complete driver reinstallation procedure:
- Go to Settings, then Apps, and uninstall ScanSnap Home (or ScanSnap Manager if using older software)
- Open File Explorer and navigate to C:\Program Files (x86)\PFU
- Delete the entire PFU folder to remove residual driver files
- Optionally clear the C:\Windows\SSDriver\SSMini folder if corrupted files exist there
- Restart your computer completely
- Download the latest ScanSnap Home from Fujitsu’s official support site for your specific model
- During installation, skip the USB setup step when prompted
- Select “Connect without using USB cable” to complete setup via Wi-Fi instead
This method permanently resolved USB recognition issues for many users after Windows 22H2 updates. Switching to Wi-Fi connection bypasses problematic USB driver loading entirely.
Manually Reinstall Drivers Using Device Manager
When your scanner appears as “Unknown Device” or shows a yellow exclamation mark, manually installing the correct driver often resolves recognition issues.
Steps for manual driver installation via Device Manager:
- Connect your scanner and open Device Manager
- Expand the Imaging devices or Other devices section
- Right-click your ScanSnap scanner and select Update driver
- Choose Browse my computer for driver software
- Select Let me pick from a list of available drivers on my computer
- Click Have Disk and browse to C:\Windows\SSDriver\SSMini
- Select the appropriate .inf file based on your model and operating system architecture
Driver file selection by model:
- iX2500 or iX2400: SSiX2500-x64.inf (64-bit) or SSiX2500.inf (32-bit)
- iX1600, iX1400, or iX1500: SSiX1500-x64.inf (64-bit) or SSiX1500.inf (32-bit)
- iX1300: SSiX13-x64.inf (64-bit) or SSiX13.inf (32-bit)
- iX100: SSiX100-x64.inf (64-bit) or SSiX100.inf (32-bit)
- iX500: SSiX500-x64.inf (64-bit) or SSiX500.inf (32-bit)
- S1500: SSiX1500-x64.inf (64-bit) or SSiX1500.inf (32-bit)
- S1300i: S1300i-x64.inf (64-bit) or S1300i.inf (32-bit)
- SV600: SV600-x64.inf (64-bit) or SV600.inf (32-bit)
After selecting the correct file, confirm installation and restart your computer fully. A complete restart, not just shutdown, is required for driver changes to take effect.
Fix ScanSnap Scanner Not Working After Windows 11 Updates
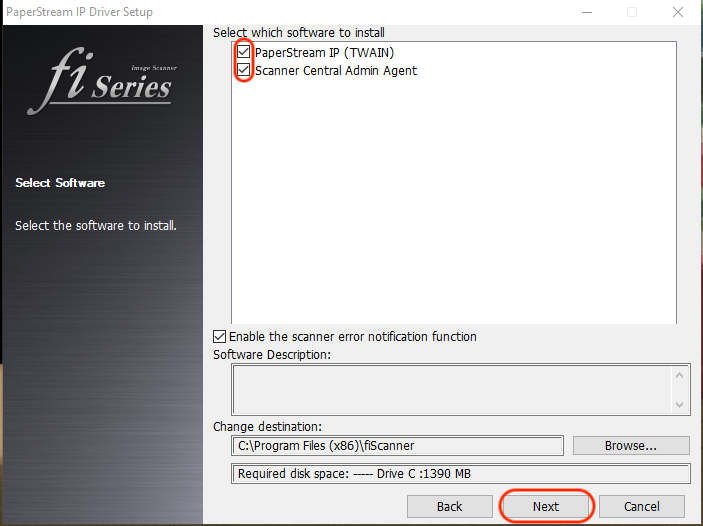
Windows 11 22H2 and 24H2 updates are directly implicated in breaking compatibility with older ScanSnap drivers. If your scanner worked before an update and stopped afterward, this specific fix addresses the root cause.
Windows 11 24H2 fix using PaperStream IP:
- Sign in to your computer as an administrator
- Disconnect the scanner from your PC completely
- Open Control Panel, go to Programs, and uninstall all PaperStream IP drivers
- Open Settings and navigate to Windows Update
- Enable “Get the latest updates as soon as they’re available” if not already active
- Install any pending updates and restart your PC
- Download the latest PaperStream IP (TWAIN) driver from Fujitsu’s official support site
- Reinstall PaperStream IP (TWAIN) driver
- If using PaperStream Capture or ClickScan, ensure PaperStream IP (TWAIN) is also installed
- Reconnect your scanner and test functionality
This approach works because Windows updates often block legacy or unsigned USB drivers while maintaining compatibility with newer PaperStream drivers designed for current operating systems.
Configure Firewall Settings for Wireless Scanning
Windows Defender Firewall and third-party security software frequently block communication between your scanner and computer, especially when scanning over Wi-Fi. This causes physical scan buttons to stop working while computer-initiated scans may still function.
Steps to configure Windows Firewall:
- Open Windows Security and navigate to Firewall and network protection
- Click Allow an app through firewall
- Click Change settings to modify permissions
- Add ScanSnap Home to the allowed applications list
- Add PaperStream IP and related executables if installed
- Click OK to save changes
- Test scanning functionality
If you’re uncertain whether firewall is the cause, temporarily disable it to verify. If scanning works with the firewall off, add the necessary exceptions and re-enable protection.
Use System Restore as a Last Resort
When all else fails and your ScanSnap scanner stopped working immediately after a Windows update, rolling back to a previous restore point often restores functionality.
System restore procedure:
- Boot from Windows installation media or recovery environment
- Choose Repair your computer, then navigate to Troubleshoot
- Select Advanced options, then System Restore
- Choose a restore point from before the problematic Windows update
- Confirm restoration and allow your system to restart
- Test your scanner after the system fully boots
This method successfully restored ScanSnap Manager functionality for multiple users after Windows 10 and 11 updates broke compatibility.
Frequently Asked Questions About ScanSnap Scanner Not Working
Why does my ScanSnap scanner stop working after Windows updates?
Windows 11 22H2 and 24H2 updates reset the Windows Image Acquisition (WIA) service, block legacy USB drivers, and modify security settings that affect scanner communication. These changes often prevent your scanner from being recognized or responding to scan commands.
How do I know if my ScanSnap scanner is detected by Windows?
Open Device Manager and look under Imaging devices. If your scanner appears without a yellow exclamation mark, it’s detected. Alternatively, open ScanSnap Home and check for a blue checkmark next to your scanner name in the Select a scanner dropdown.
Can I use my ScanSnap scanner via Wi-Fi instead of USB?
Yes. During ScanSnap Home installation, select “Connect without using USB cable” to set up Wi-Fi connectivity. Many users report that switching to Wi-Fi permanently resolves USB driver issues after Windows updates.
What driver file do I need for my specific ScanSnap model?
The driver depends on your model and operating system. For example, iX1500 uses SSiX1500-x64.inf for 64-bit Windows, while iX500 uses SSiX500-x64.inf. Find the correct file in the C:\Windows\SSDriver\SSMini folder or download from Fujitsu’s support site.
Why does my scanner show a red exclamation mark in ScanSnap Home?
A red exclamation mark indicates communication failure between your computer and scanner. This typically stems from driver issues, USB connection problems, or WIA service misconfiguration. Work through the troubleshooting steps in this guide to identify and resolve the specific cause.
Is ScanSnap Manager still supported?
No. ScanSnap Manager is deprecated and no longer updated by Fujitsu. For best compatibility with Windows 11 and macOS Sequoia, migrate to ScanSnap Home, which receives ongoing updates and support.
Key Takeaways for Fixing Your ScanSnap Scanner
Most ScanSnap scanner issues stem from Windows updates resetting critical service permissions, USB driver conflicts, or outdated software. The troubleshooting flow works from simplest fixes (power cycle, USB port changes) to more involved solutions (WIA service repair, clean driver reinstall, Wi-Fi setup bypass). Always document your settings before major Windows updates to enable faster recovery. For persistent issues after trying all steps, switching to Wi-Fi connection or using PaperStream IP drivers often provides a permanent solution when USB compatibility fails. Regular software updates, proper USB connections (direct to USB 2.0 ports), and firewall configuration prevent most future problems. If official support proves unhelpful, community forums and this comprehensive troubleshooting approach resolve the vast majority of ScanSnap scanner not working issues across all Fujitsu models.