
You’ve got a stack of papers that need digitizing, but the scanning process seems confusing. Whether you’re using a standalone scanner, an all-in-one printer, or your smartphone, getting a physical document into a clean digital file is straightforward once you know the right steps. This guide covers every method across Windows, macOS, Chromebook, mobile apps, and printer control panels.
By the end, you’ll know how to scan documents to PDF, email, cloud storage, and more. You’ll also learn troubleshooting tips, best settings for different document types, and file management strategies that keep your digitized papers organized.
Connect Your Scanner to Your Computer
Your scanner must communicate with your device before you can scan anything. The connection method depends on your hardware, and choosing the right one ensures reliable performance.
Connection Types Explained
Most scanners support one or more of these connection methods:
- USB (Wired): Plug directly into your computer. This is the most reliable method for desktops and laptops.
- Wi-Fi (Wireless): Connects over your home or office network. Ideal when scanning from multiple devices.
- Bluetooth: Common in portable scanners. Pair via your device’s Bluetooth settings.
- Ethernet (Network): Used in office scanners. Multiple users can access the same device.
- Cloud-Enabled: Some models upload directly to Google Drive, Dropbox, or OneDrive without a computer.
Always ensure your scanner and computer are on the same network for wireless or cloud scanning.
Prepare the Scanner for Use
Before scanning your first document:
- Turn on the scanner or all-in-one printer.
- Open the lid and place your document face-down on the glass.
- Align it with the corner guides to avoid skewed scans.
- For Automatic Document Feeder (ADF) models, load documents according to your model (usually face-up or face-down).
- Don’t exceed the sheet limit, typically 20 to 50 pages.
- Clear any paper jams before scanning.
Clean the glass with a microfiber cloth first. Dust and smudges cause blurry or streaky results that ruin your digital copies.
Install Scanner Drivers and Software

Your computer needs the right software to communicate with the scanner. Luckily, modern systems include built-in tools, and manufacturers offer dedicated apps for advanced features.
Use Built-In Operating System Tools
Modern operating systems include native scanning applications, so you don’t always need extra software:
- Windows: Use the Scan app or Windows Fax and Scan
- macOS: Use Image Capture or Printers & Scanners in System Settings
- ChromeOS: Use the built-in Scan app
These tools auto-detect connected scanners and handle basic to advanced scans without additional installation.
Install Manufacturer Software for Full Features
For complete functionality like scanning to email or cloud services, install official apps:
- HP: HP Smart
- Canon: Canon PRINT
- Epson: Epson Scan
- Brother: Brother iPrint&Scan
Download these from the manufacturer website or your app store. These applications often support remote scanning, OCR text recognition, and mobile synchronization.
Consider Third-Party and Web-Based Options
If you prefer not to install software, several alternatives exist:
- Adobe Scan (iOS/Android): AI-powered with OCR and cloud sync
- CamScanner and Microsoft Lens: Great for mobile use
- Web-based scanners: Run in your browser with no installation required
Web-based scanners process files locally on your device, never uploading them to servers. This makes them ideal for privacy-sensitive documents like IDs or medical records.
Scan a Document on Windows
Windows offers two built-in methods for scanning. The Scan app is fastest for most users, while Windows Fax and Scan works better for older scanners or custom profiles.
Method One: Windows Scan App
This is the quickest way to scan on Windows 10 and 11:
- Press the Windows key, type “Scan,” and open the app.
- Select your scanner from the dropdown menu.
- Choose the source: Flatbed for single pages or Feeder for batch scanning.
- Select your file type. PDF is recommended for documents.
- Click “Show more” to adjust resolution (300 DPI for standard documents, 600 DPI for archival), color mode (Color, Grayscale, or Monochrome), and save location.
- Click “Scan.”
- After completion, click “View” to open the file or “Close” to scan another document.
The file automatically saves to your selected folder, typically in Pictures\Scans.
Method Two: Windows Fax and Scan
For legacy scanners or custom workflows:
- Search for “Windows Fax and Scan” in the Start menu.
- Click “New Scan” and select your scanner.
- Choose a profile: Document, Photo, or Custom.
- Set your color format, file type, and resolution (200 to 300 DPI works for most documents).
- Click “Preview” to check alignment.
- Adjust if needed, then click “Scan.”
- The file saves to Documents > Scanned Documents.
Fix Common Windows Scanning Problems
Scanner not detected? Go to Settings > Devices > Printers & scanners and add your device manually. If the Scan app is missing, reinstall it from the Microsoft Store. For persistent “No scanner found” errors, restart the Windows Image Acquisition (WIA) service in the Services app.
Scan a Document on macOS
Mac users have two straightforward options: the simple Printers & Scanners method or the more powerful Image Capture app.
Use Printers & Scanners in System Settings
The easiest method for most Mac users:
- Click the Apple icon and open System Settings.
- Go to Printers & Scanners.
- Select your scanner from the list.
- Configure your save location, document size, and file format.
- Click “Scan.”
Files save to your chosen folder, defaulting to Documents.
Use Image Capture for Advanced Control
For batch scanning and more options:
- Open Image Capture from the Applications folder.
- Select your scanner from the device list.
- Choose scan mode, file format, destination folder, and resolution (enable “Show Details” to see all options).
- Click “Scan.”
Image Capture lets you save scan profiles for recurring tasks, saving time on repetitive jobs.
Add Scanner Manually If Needed
If your scanner doesn’t appear automatically, click the + button in Image Capture, select your scanner from the detected devices, and add it manually. macOS includes built-in drivers for most scanners, so you typically only need manufacturer software for specialized features.
Scan a Document on Chromebook
Chromebooks support network and USB scanners through their built-in scanning utility.
Use the Native Scan App
- Click the time in the bottom-right corner and open Settings.
- Scroll to Advanced > Printing and Scanning > Scan.
- Select your scanner from the dropdown.
- Click “Scan.”
The file downloads to your Downloads folder. Your scanner and Chromebook must be on the same Wi-Fi network for this to work.
Scan Directly from Printer Control Panel
Many all-in-one printers let you scan without any computer. This is perfect for quick jobs or when your computer isn’t nearby.
Scan Using HP All-in-One Printers
- Place your document face-down on the glass, aligning with corner guides.
- On the printer screen, tap “Scan” then “Scan to Computer.”
- Set color mode, resolution (150 to 600 DPI), and file format (PDF or JPG).
- Choose your computer as the destination.
- Tap “Scan” and wait for confirmation.
- Find your file in Documents > Scans, Downloads, or the HP Smart app.
If scanning fails, install HP Smart from support.hp.com and ensure your firewall allows scanning connections.
Scan Using Canon All-in-One Printers
Canon printers work similarly across operating systems. On Windows, use Windows Fax and Scan. On macOS, open System Settings > Printers & Scanners, select Canon, and click “Open Scanner.” On Chromebook, use the ChromeOS Scan app.
Scan to Email or Cloud Storage
Modern printers can send scanned documents directly to your inbox or cloud storage, eliminating the need for a computer in the workflow.
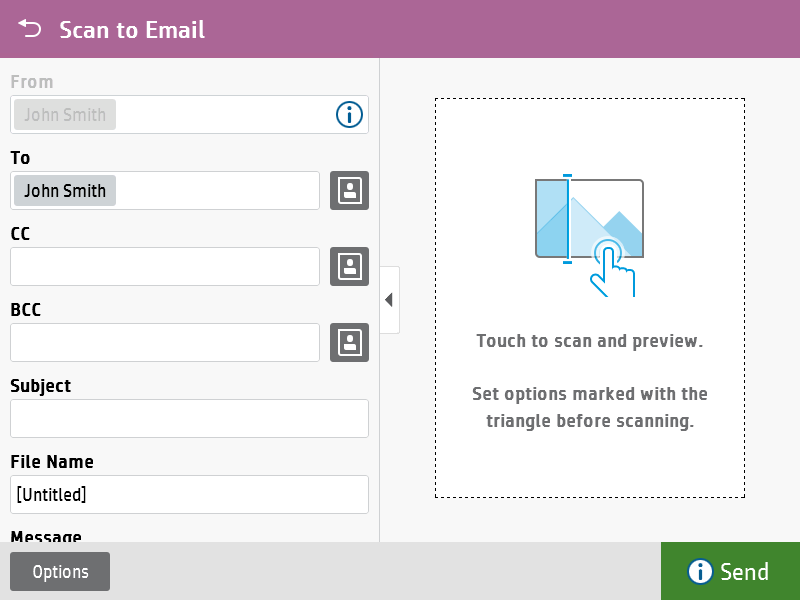
Send Scans Directly to Email
To scan to email, your printer needs Wi-Fi or Ethernet connectivity and an email account configured. On the printer panel, select Scan > Scan to Email, enter the recipient, log in if prompted, set your file type (PDF works best) and resolution (200 to 300 DPI), place your document, and press Send.
Some printers support only specific email services. Check your manual for compatibility.
Upload to Cloud Storage Services
You can scan directly to Google Drive, Dropbox, OneDrive, or Adobe Document Cloud:
- On the printer, choose Scan > Scan to Cloud.
- Select your service and sign in (first-time setup may use a QR code).
- Navigate to or create a folder.
- Set file format and resolution.
- Press Scan or Upload.
- Your file appears in the cloud folder within minutes.
Enable two-factor authentication on your cloud accounts for security, and use app-specific passwords if your printer requires them.
Use Mobile Scanning Apps
Mobile apps turn your smartphone into a portable scanner with smart features like automatic edge detection and text recognition.
Scan with Adobe Scan
Adobe Scan offers the most comprehensive mobile scanning experience:
- Open Adobe Scan and point your camera at the document.
- The app auto-detects edges. Tap to capture.
- Add more pages for multi-page PDFs.
- Tap Save to store in Adobe Document Cloud.
- Tap Open in Acrobat to edit or export.
Adobe Scan includes AI edge detection, shadow removal, OCR that converts scans to searchable text, and export options including PDF, JPEG, and DOCX. Files are encrypted and only accessible with your Adobe ID.
Use Web-Based Scanners for Privacy
For maximum privacy without installing anything:
- Open a web scanner in any browser (Chrome, Safari, Firefox).
- Use your camera or upload existing files.
- Adjust brightness, contrast, and crop.
- Enable auto-straighten and shadow removal.
- Combine multiple pages into one PDF.
- Download the result directly.
These tools process everything locally on your device, so sensitive documents never leave your computer.
Choose the Right File Format
The format you choose affects file size, quality, and how you can use the scan later.
Format Recommendations by Use Case
| Format | Best For | Notes |
|---|---|---|
| Universal sharing, multi-page documents | Preserves layout; searchable with OCR | |
| JPG | Photos, quick sharing | Smaller size; lossy compression |
| PNG | High-quality images | Lossless; larger files |
| TIFF | Archival, legal, medical | Huge files; long-term preservation |
| DOCX | Editable text | Requires OCR conversion |
For most documents, PDF at 300 DPI with Grayscale provides the best balance of quality and file size.
Optimize Scan Settings for Quality

Resolution and color mode dramatically affect your results. Making the right choices upfront saves time on retakes.
Resolution Guidelines
- 150 DPI: Acceptable for quick reference
- 200 to 300 DPI: Standard for contracts, invoices, and business documents
- 600 DPI: Recommended for archival, legal, and detailed images
- 1200 DPI: Professional graphic design and restoration work
Color Mode Recommendations
- Grayscale: Best for black text documents. Reduces file size while maintaining readability.
- Color: Use for signatures, colored text, or photographs.
- Black and White: For simple text. Creates the smallest file sizes.
Match your settings to your use case. Invoices need 300 DPI Grayscale PDF. Handwritten notes benefit from 300 DPI Color PDF. Legal documents should use 300 to 600 DPI in PDF/A format for long-term compliance.
Troubleshoot Common Scanner Problems
When scanning goes wrong, these solutions address the most frequent issues.
Scanner Not Detected
Loose cables and missing drivers cause most detection failures. Reconnect USB cables or rejoin Wi-Fi networks. Restart both the scanner and computer. Reinstall the driver from the manufacturer’s website if problems persist.
Poor Image Quality
Dirty scanner glass is the usual suspect. Clean the glass with a microfiber cloth. Increase your DPI to 300 or higher. Avoid scanning glossy paper under bright lights, as reflections create glare.
Crooked or Partial Scans
Reposition documents using alignment guides. Enable auto-straighten in your scanning app. Make sure the entire page sits on the glass with edges visible.
File Not Saving
Verify your save location. Default folders vary by operating system. Update your manufacturer app and try running the scanner software as administrator on Windows.
Cloud or Email Scanning Fails
Reconnect your account and verify passwords. Check that printer firmware is current. Some printers require app-specific passwords for cloud services.
Organize and Maintain Your Scanned Files
Good organization makes your scanned documents useful. Maintenance keeps your scanner producing quality results.
Know Where Files Save
Default locations vary by platform. Windows Scan app saves to Pictures\Scans. Windows Fax and Scan uses Documents\Scanned Documents. macOS defaults to Documents. Chromebook files go to Downloads. Mobile apps create app-specific folders or sync to cloud storage.
Best Practices for File Management
Rename files immediately using descriptive names like Invoice_Jan2025.pdf or Contract_Smith.pdf. Use consistent naming conventions. Store copies in cloud services like OneDrive or Google Drive for backup. Save multi-page documents as single PDFs. Create folders or tags for categories like Taxes, Medical, or Contracts.
Maintain Your Scanner
Clean the glass weekly with a microfiber cloth and non-abrasive cleaner. Never use window spray on scanner surfaces. Avoid touching the glass with bare fingers because oils degrade scan quality. Cover your scanner when not in use to prevent dust accumulation. Clean ADF rollers with a dry cloth to prevent paper jams. Update firmware and software regularly through manufacturer apps.
Frequently Asked Questions About Scanning Documents
How do I connect my scanner to my computer?
Connect your scanner using USB, Wi-Fi, Bluetooth, or Ethernet depending on your model. For USB, plug the cable into an available port. For wireless, ensure both devices are on the same network. Most scanners auto-detect in Windows, macOS, and ChromeOS without manual configuration.
What is the best resolution for scanning documents?
For standard business documents, 200 to 300 DPI provides clear text and reasonable file sizes. Use 600 DPI for archival purposes, legal documents, or detailed images. Lower resolutions like 150 DPI work only for quick reference copies where quality matters less.
Which file format should I use for scanned documents?
PDF is the recommended format for most scanned documents. It preserves formatting, supports multiple pages in one file, and becomes searchable when combined with OCR. Use JPG for photos and PNG when you need lossless image quality.
Why is my scanner not detected by my computer?
This usually happens due to loose cables, network disconnection, or missing drivers. Reconnect USB cables or rejoin Wi-Fi. Restart both devices. Go to your operating system’s printer settings and manually add the scanner if it doesn’t appear automatically.
Can I scan documents directly to cloud storage?
Yes, many modern printers and all-in-one devices support direct scanning to Google Drive, Dropbox, OneDrive, or Adobe Document Cloud. On the printer control panel, select Scan to Cloud, choose your service, sign in, and press Scan. Your document uploads automatically without a computer.
How do I scan multiple pages into one PDF?
Use your scanner’s Automatic Document Feeder (ADF) if available. In software like Windows Scan or macOS Image Capture, select the feeder as your source and scan multiple pages sequentially. The software combines them into a single PDF automatically.
Key Takeaways for Scanning Documents Successfully
Scanning documents is straightforward when you follow the right steps. Connect your scanner via USB or Wi-Fi, install appropriate drivers, choose your software (built-in OS tools for simplicity or manufacturer apps for full features), configure resolution and format settings, and save to your preferred location.
For best results, use 300 DPI with PDF format for most documents. Clean your scanner glass regularly and keep software updated. Organize files with clear naming conventions and store backups in cloud services. Whether using Windows, Mac, Chromebook, or mobile apps, the core process remains consistent: place your document, select your settings, scan, and save.